Smart holiday decoration storage turns next December’s setup from a frantic chore into a calm afternoon routine. When you pack items in the exact reverse order you display them, every strand and centerpiece lands right where you need it.
A rushed post holiday cleanup hides tangled cords, cracked bulbs, and leaky batteries inside mismatched boxes. Fixing those habits now protects your favorite keepsakes and clears your hallways faster.
This practical guide walks you through sorting, container sizing, safe climate zoning, and room-by-room labeling so your future self opens every bin ready to decorate.
Why Post Holiday Cleanup Determines Next Year’s Stress Level
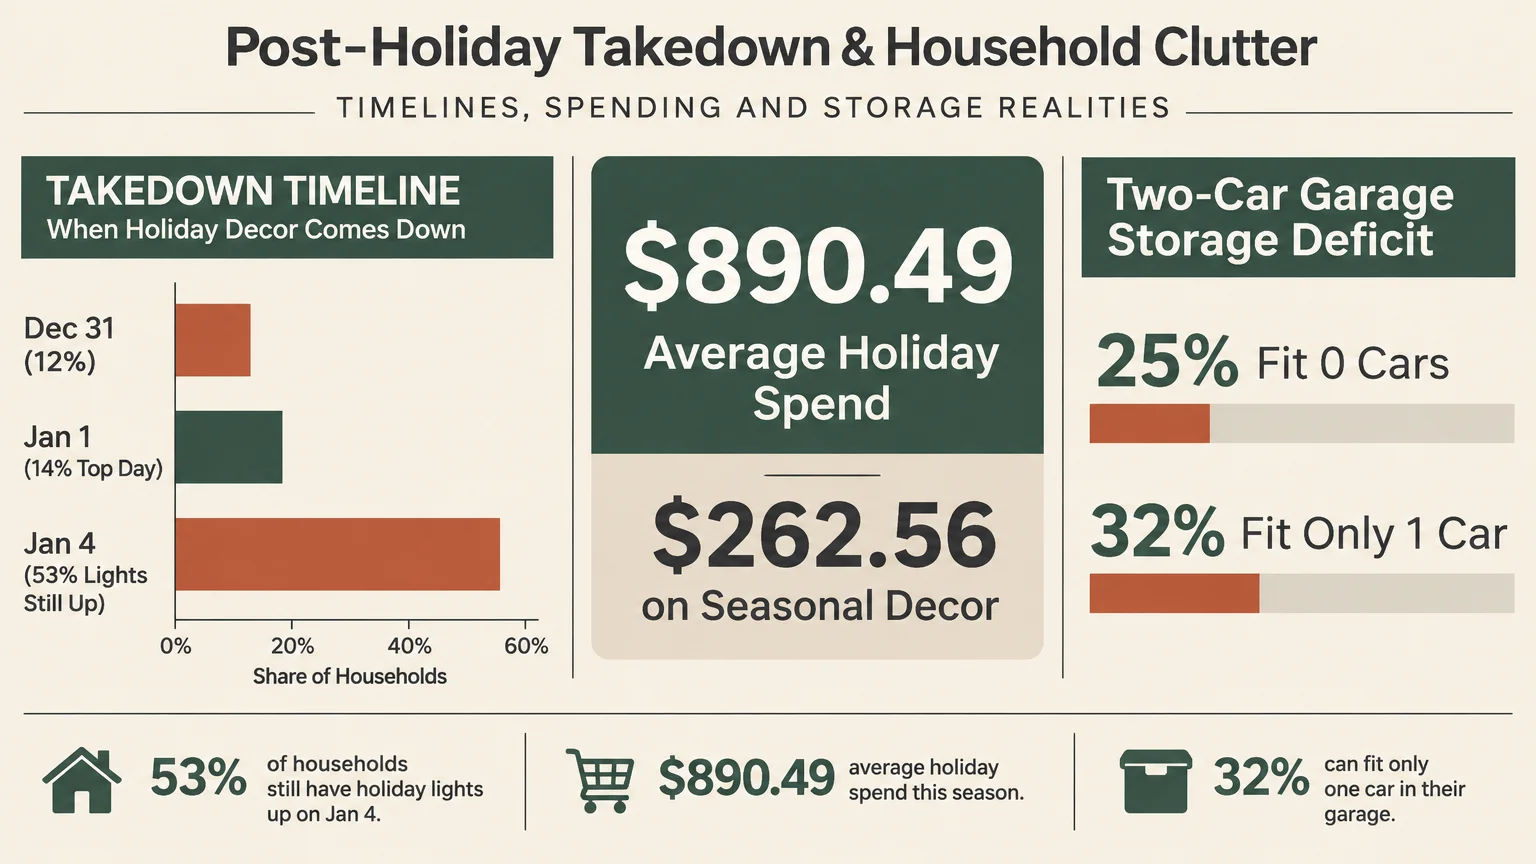
Holiday decor is a real investment worth protecting. According to the National Retail Federation’s 2025 consumer survey, U.S. shoppers planned to spend $890.49 per person on the holidays, including $262.56 on seasonal items like decorations, food, and greeting cards.
With 91% of U.S. adults celebrating winter holidays in both 2025 and 2026, disorganized boxes create recurring frustration across millions of homes. Poor storage systems turn joyful traditions into annual scavenger hunts.
An October 2024 Talker Research survey of 2,000 U.S. adults for The Container Store revealed how deeply seasonal disarray affects households. Roughly 47% of respondents felt overwhelmed, and 48% felt crunched for time—wishing for nearly 50 extra hours to prepare.
Even more telling, 55% said they often did not know where to place everyday items when decorating for guests, and 31% would pay someone to handle pre-holiday organizing. Clearing clutter systematically during takedown eliminates that chaos before next season begins.
Most households tackle pack-up right after New Year’s Day, though timelines vary widely:
- A 2024 This Old House survey found only 12% of decorators remove lights by December 31, while January 1 ranks as the top takedown day at 14%.
- The same survey showed 53% still leave lights up on January 4.
- A Neighbor survey of 1,101 Americans found 51% view January 2 as the ideal pack-up day, whereas 31% consider January 15 and 33% consider February 1 too late.
Leaving boxes stacked in hallways or garages wears on daily routines long after winter ends. Peer-reviewed UCLA research by Saxbe and Repetti in 2010 linked cluttered or unfinished homes to flatter daily cortisol patterns in women.
Garage overflow compounds the problem. U.S. Department of Energy figures show 25% of homeowners with two-car garages cannot fit a single car inside due to stored items, and 32% can fit only one.
Treating post holiday cleanup as next year’s staging session protects your budget, reclaims your garage, and restores calm living spaces. You spend slightly more energy today to buy back hours next fall.
The Reverse Takedown Workflow: Organizing Decorations as You Pack
Most people drag down every bin at once, creating an exhausting obstacle course in the living room. Instead, pack your home in the exact reverse order you decorate it.
Because you typically unpack the tree and outdoor lights first, those items belong at the back or bottom of your storage stack—except for one small hardware kit. Centerpieces, entryway garlands, and tabletop accents pack up last so they stay easiest to grab.
Before climbing a ladder, clear your walkways to stay safe. Holiday safety data cited alongside U.S. Consumer Product Safety Commission reports notes roughly 5,800 annual emergency room visits for decoration falls and 4,000 for extension cords, half from tripping.
Follow this step-by-step sequence to finish organizing decorations without creating secondary clutter:
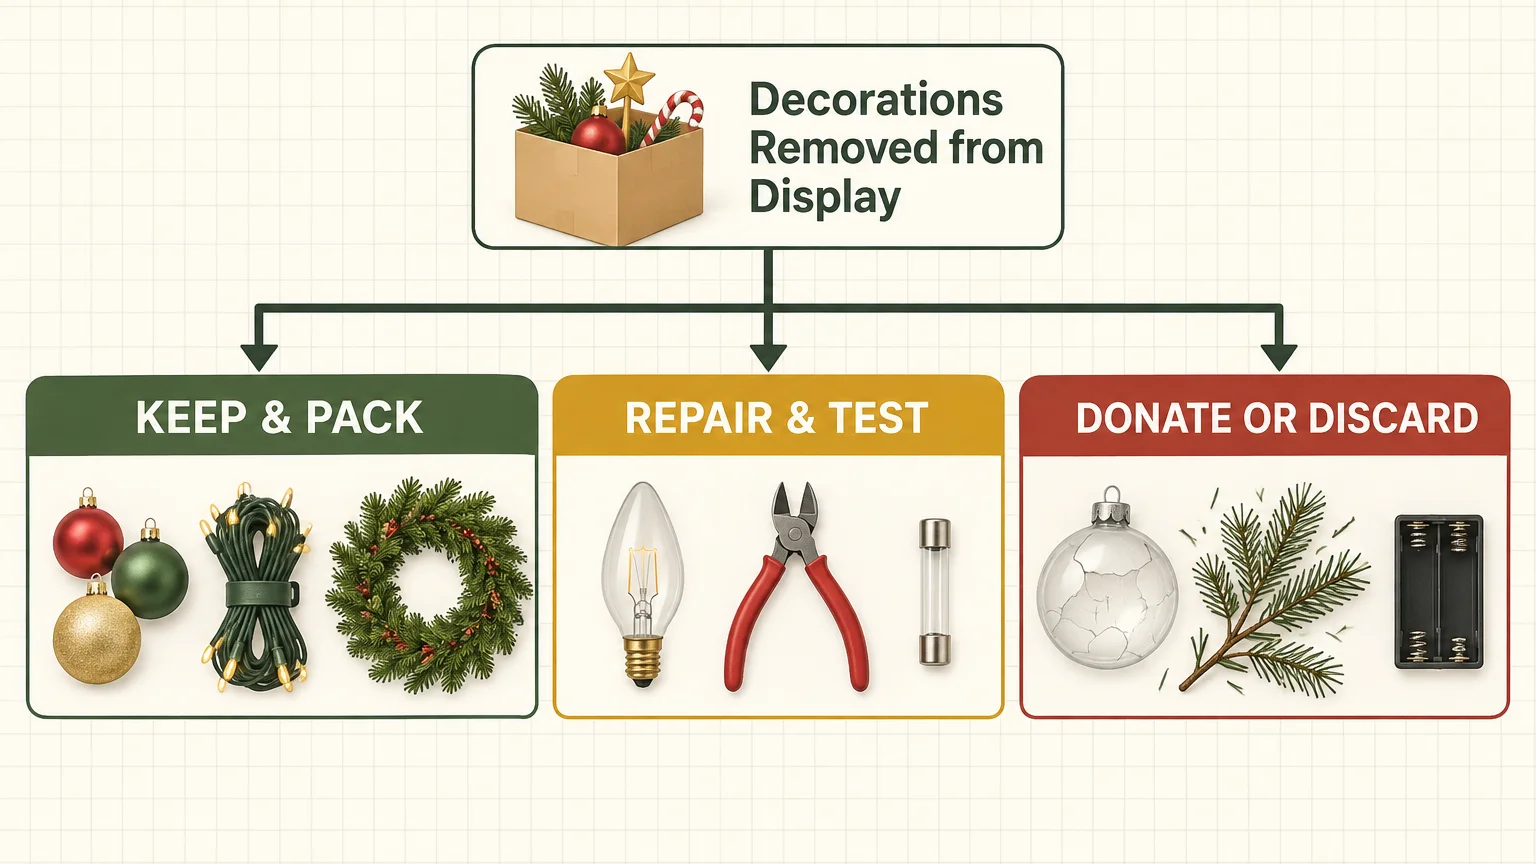
- Stage three sorting zones in one room: Lay out an old sheet or drop cloth and divide floor space into Keep and Pack, Repair or Test, and Donate or Discard areas.
- Remove outdoor lighting and porch pieces first: Unplug extension cords cleanly, coil each line before moving inside, and ask a helper to spot your ladder on icy walkways.
- Strip the tree from top to bottom: Lift off the topper first, wrap fragile heirloom ornaments, pack shatterproof filler bulbs, wind garlands, and unwind light strands in reverse order.
- Clear mantels, banisters, and dining surfaces next: Keep all candles, greenery, and holders grouped by room rather than mixing mantel pieces with kitchen decor.
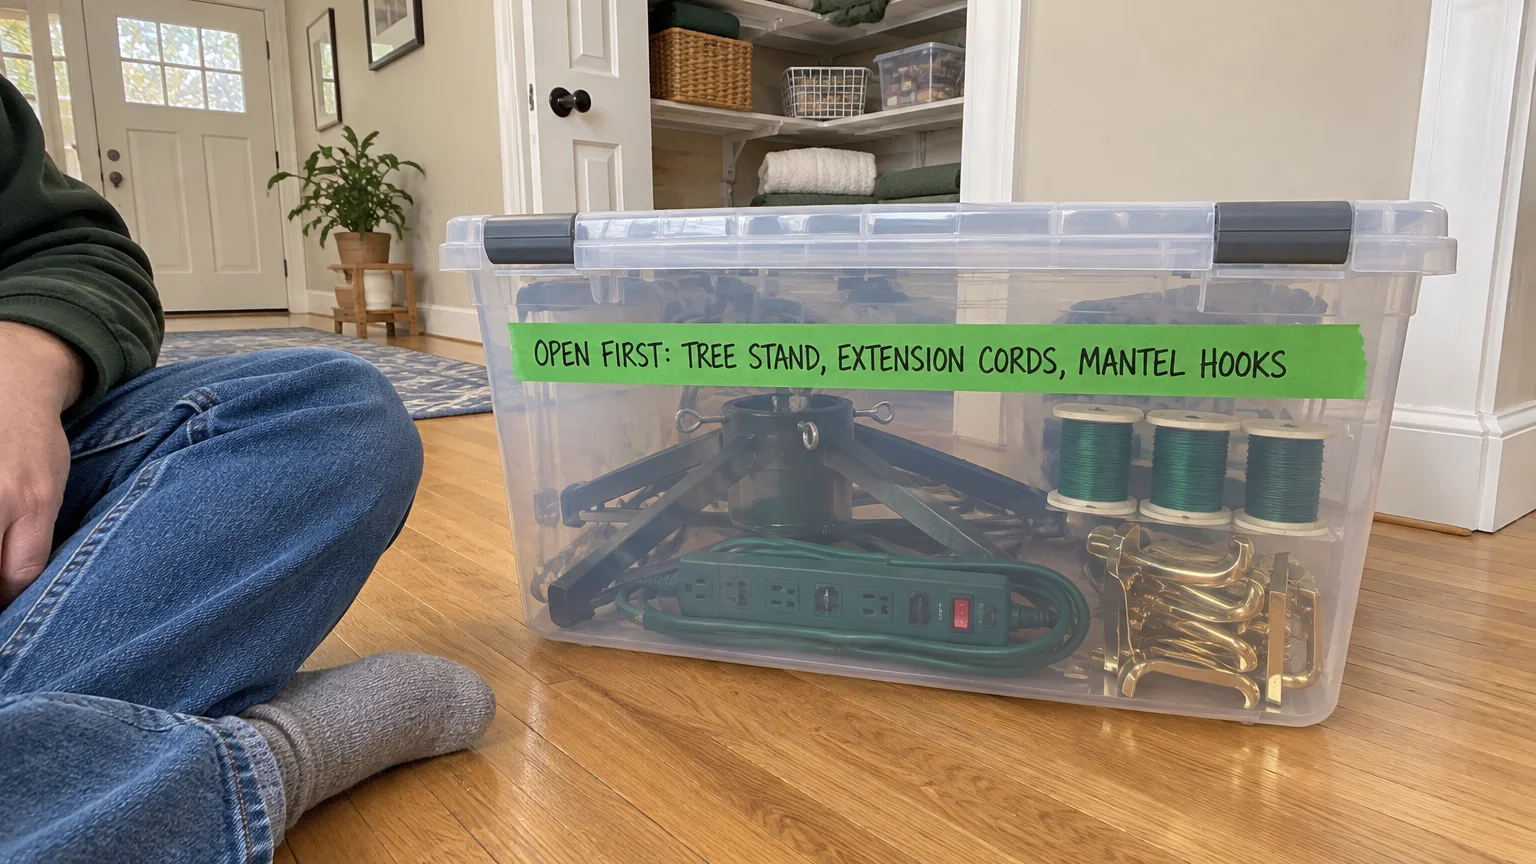
- Pack hardware and electrical accessories together: Drop timers, ornament hooks, zip ties, spare fuses, and extension cords into one small, clearly labeled bin that sits at the front of your storage rack.
- Load bins in reverse priority order: Place off-season heavy totes on lower shelves first, then position your hardware kit and indoor tabletop bins where you can reach them easily next November.
If your energy fades midway—especially helpful to monitor if you are an older adult simplifying household chores—work on one room per day. Keeping the three staging zones intact prevents scattered piles from taking over your dining table.
Realistic Sort-and-Purge Criteria Before Anything Hits a Bin
Every broken strand or dusty floral pick you box up steals shelf space from pieces you genuinely love. Decluttering during takedown works better than decluttering next December because you remember exactly what frustrated you this week.
Apply this honest filter to every item resting in your staging zone:
- Skip-season check: Did this wreath, pillow, or figurine sit untouched inside a bin across multiple holidays? If it no longer matches your taste or layout, donate it while clean.
- Repair reality check: Will you realistically rewire a cracked ceramic house or glue a shattered finial before November? Discard unfixable pieces immediately instead of storing guilt.
- Safety and code check: Does any light strand show exposed copper, melted sockets, or flickering segments? Damaged electrical decor belongs in the trash or recycling, never back on a shelf.
- Sentimental boundary check: Are duplicate handmade crafts crowding out your favorites? Keep the best examples, photograph oversized projects on your phone, and free up physical bin space.
Timing matters for live greenery and outdoor wiring too. The National Fire Protection Association advises disposing of a real Christmas tree promptly after Christmas or as soon as it dries out, since dried needles ignite rapidly.
Electrical codes set a clear timeline for exterior displays too. Under Section 590.3(B) of the 2023 National Electrical Code cited by the National Fire Protection Association, temporary holiday decorative lighting and wiring may stay installed for no more than 90 days.
Packing up on time protects your home from electrical wear and keeps gutters and siding clear before spring storms arrive. Place clean, usable donations in a marked bag beside your garage door so they leave your house on your next errand run.
Choosing Durable Containers for Holiday Decoration Storage
Swapping crumbling cardboard boxes for sealed plastic bins solves two problems at once: structural collapse and winter pests. Moisture weakens cardboard seams over time, causing stacked boxes to buckle and spill fragile glass across concrete floors.
Worse, cardboard attracts unwanted winter company. According to the National Pest Management Association, nearly 21 million U.S. households face winter rodents between October and February, and mice fit through quarter-inch gaps—the size of a dime.
Pest specialists and Kansas State University Extension experts warn that cardboard absorbs moisture while providing food and shelter for silverfish, cockroaches, and rodents.
Kansas State University Extension recommends inspecting items for pests or damage and packing them into sealed plastic containers with tight-fitting locking lids stored off the floor.
When shopping for bins, resist buying mismatched bargain totes across multiple stores. Standard 27-gallon heavy-duty plastic totes look nearly identical on store endcaps, yet their dimensions are not standardized across retailers.
A standard 27-gallon Greenmade bin from Costco measures about 30.4 by 20.4 by 14.7 inches, weighs roughly 7.1 pounds empty, and includes recessed stacking lids with padlock slots.
By contrast, Home Depot’s HDX 27-gallon tote has a 28.5 by 19.6-inch base that runs taller and narrower than Lowe’s Commander and Costco Greenmade models.
Mixing brands creates lids that wobble when stacked and bins that fail to fit DIY ceiling or wall-slide racks. Choose one retailer’s tote line and stick with it whenever you expand your storage system.
Clear plastic bins work brilliantly inside interior closets because you identify contents at a glance without unlatching lids. Heavy-duty opaque totes with reinforced rims handle colder garage racks better without growing brittle, provided you apply bold exterior labels.
| Decor Category | Best Container Type | Typical Size or Capacity | 2026 Retail Benchmark | Durability & Stacking Note |
|---|---|---|---|---|
| Standard Ornaments | Divided fabric or polypropylene box | 64-count or 72-count 3-tray | $14–$45 | Flexible sides save money; never stack heavy totes on top |
| Large Ornament Collections | Rigid waterproof divided plastic case | 128-count multi-tray | $57–$102 | Resists crushing in stacks; soft 128-count versions cost $17–$30 |
| Garlands, Skirts & Outdoor Lights | Heavy-duty locking plastic tote | 27-gallon (approx. 30.4″ × 20.4″ × 14.7″) | Store brand standard pricing | Recessed lids lock securely; stick to one brand for clean stacking |
| Artificial Christmas Trees | Tear-resistant nylon zippered bag | 56 inches long (trees up to 9–10 ft) | $28–$42+ (including 2-piece sets) | Protects needles from dust; wrap branches with straps before loading |
| Evergreen & Grapevine Wreaths | Circular zippered wreath bag | 24 inches to 72 inches wide | Varies by diameter | Pick models with an internal hook to prevent bottom flattening |
| Wrapping Paper & Ribbon | Double-layered under-bed organizer | Long flat zippered case | Around $51 | Slides under guest beds; keeps rolls flat and dust-free |
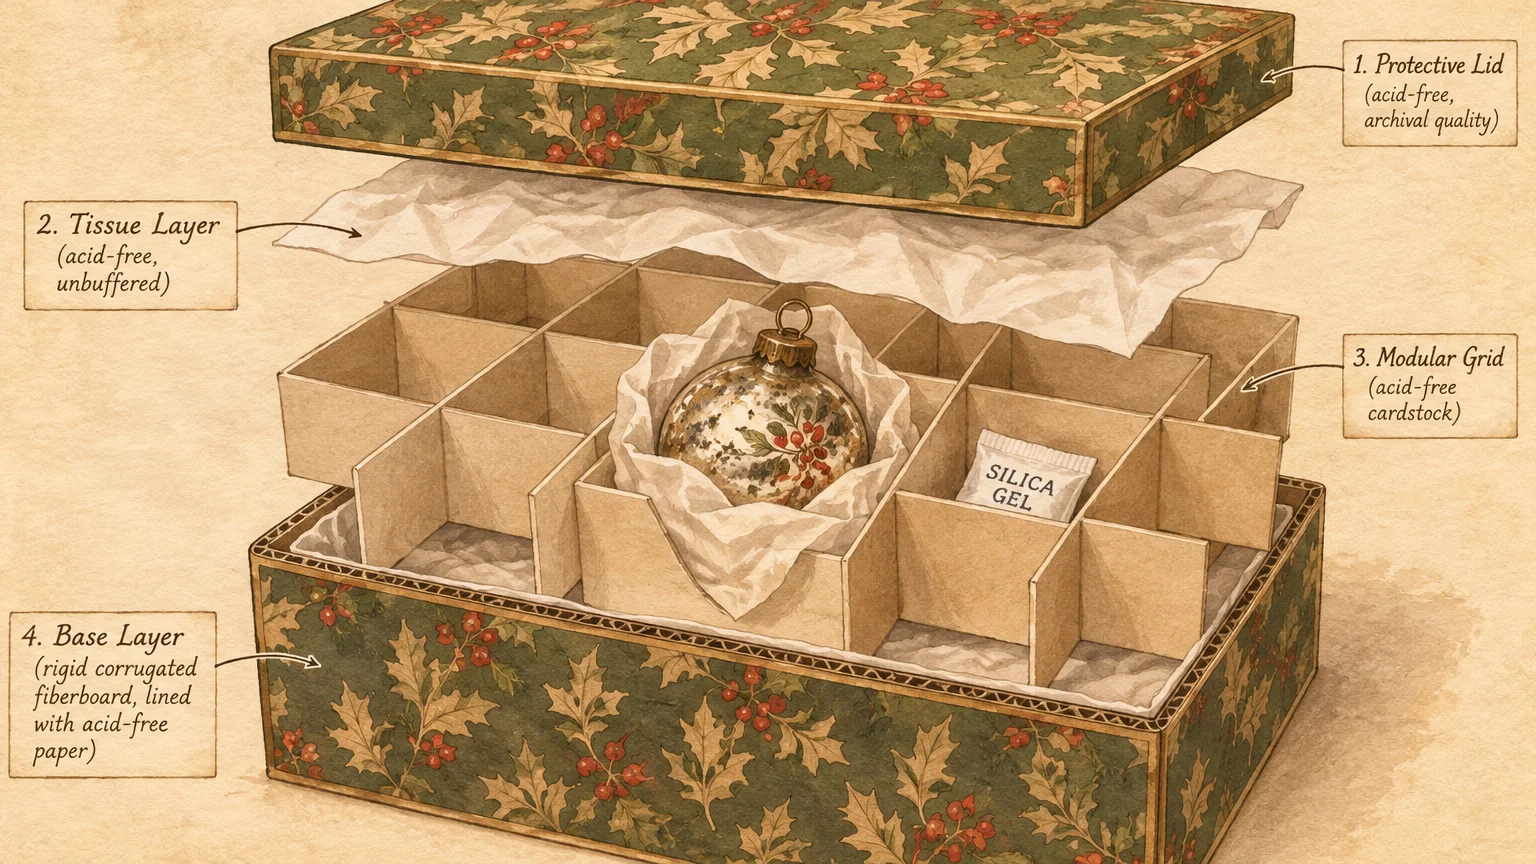
Ornament Storage and Archival Care for Fragile Keepsakes
Generic ornament boxes save you time during takedown, yet buying the wrong shell puts delicate glass at risk. Soft-sided polypropylene 128-count ornament boxes retail around $17 to $30, while rigid waterproof 128-count plastic cases cost $57 to $102.
Product testing consistently shows soft-sided fabric boxes collapse under heavy crush loads. If you stack bins vertically in a tight closet, either place soft ornament boxes on the very top shelf or invest in rigid plastic cases for bottom layers.
Heirloom glass, painted wood, vintage paper, and fabric keepsakes need careful preservation. The National Park Service recommends storing fragile keepsakes below 75 degrees Fahrenheit and between 15% and 65% relative humidity—never in damp basements, garages, or hot attics.
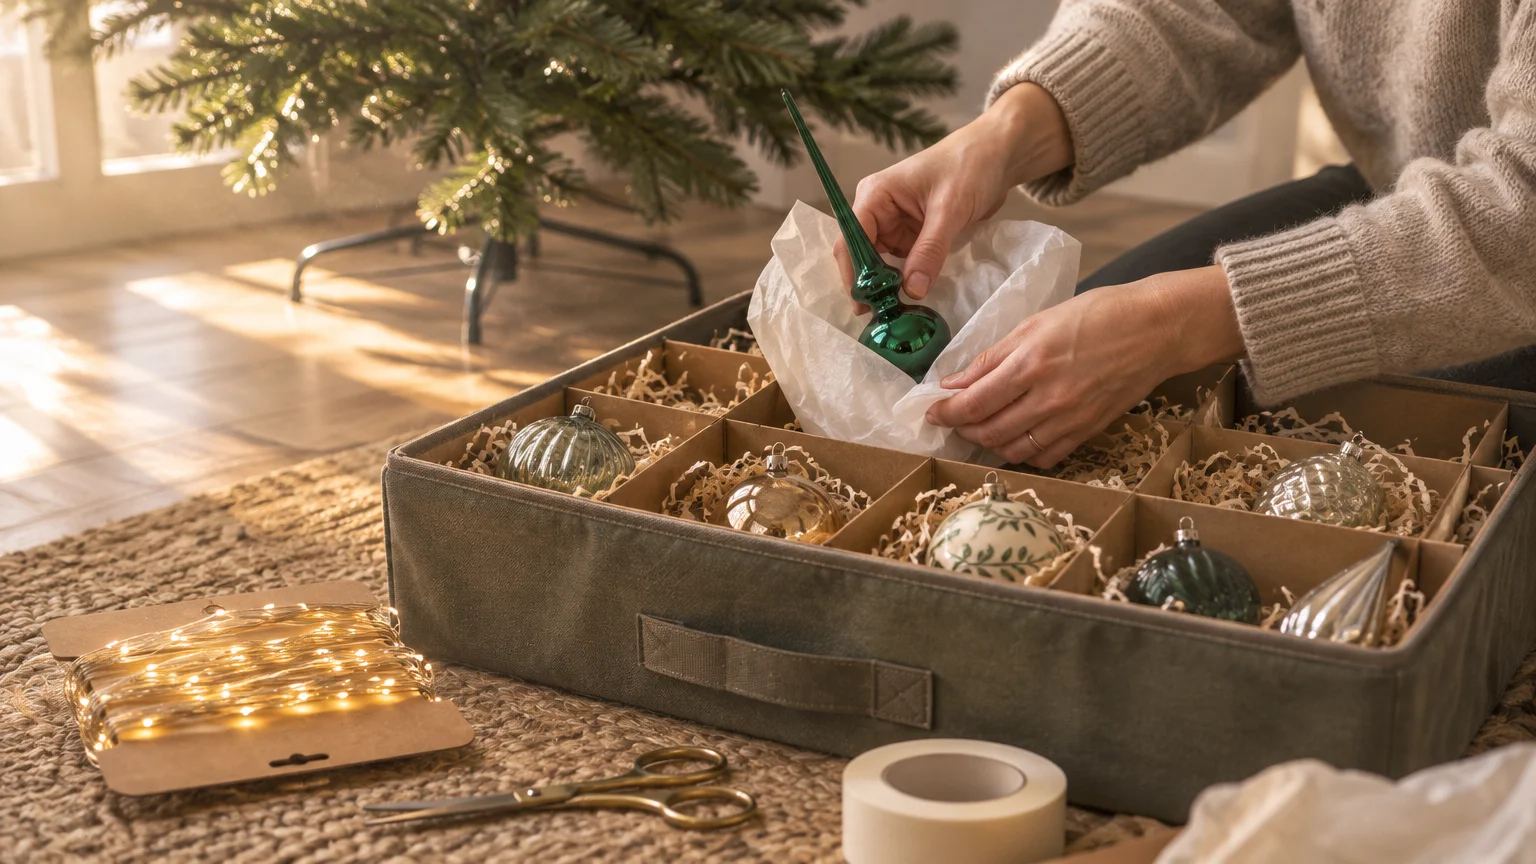
Elevate heirloom boxes off the floor on sturdy shelves and use this gentle archival packing workflow:
- Dust surfaces dry first: Wipe away pine pollen and household grit with a soft dry brush or microfiber cloth so trapped particles do not scratch delicate paint in transit.
- Choose unbuffered acid-free tissue paper: Wrap ornaments snugly—not tightly—in unbuffered acid-free sheets; standard wrapping tissue and newspaper transfer damaging acids and ink dyes, while buffered paper carries an alkaline reserve unsuitable for mixed materials.
- Give every ornament its own cell: Store strictly one ornament per compartment; museum handling rules forbid stacking glass or ceramic objects on top of one another.
- Customize oversized dividers: For tall finials or wide snow globes that exceed standard grids, cut clean corrugated dividers or glue wide plastic cups onto stiff cardboard trays inside a rigid tote.
Adjustable three-tray 72-count boxes, commonly priced around $36 to $45, let you slide cardboard partitions wider for odd-shaped keepsakes. Labeling each tray by color or family theme saves you from lifting every layer when decorating smaller tabletop trees next year.
Practical Christmas Storage Ideas for Lights, Trees, Wreaths, and Wrap
Lights, artificial trees, wreaths, and wrapping supplies consume the bulk of household storage volume. Simple containment tweaks keep these awkward shapes compact and ready for immediate setup.
Start every light takedown with a safety inspection rather than waiting until next November when stores sell out of replacements.
Both the National Fire Protection Association and the U.S. Consumer Product Safety Commission advise checking light strings for frayed or bare wires, broken or cracked sockets, and loose connections.
Discard or repair damaged strands immediately, verify that cords carry labels from an independent testing laboratory, and pack indoor-only sets separately from outdoor-rated strands. Neglecting worn wiring carries serious consequences.
National Fire Protection Association statistics show U.S. fire departments respond to roughly 835 home structure fires annually started by decorations excluding trees.
Additionally, 40%—two in five—of home Christmas tree fires involve electrical or lighting equipment, while 30% of home fires and 38% of fire deaths occur between December and February.
Once your strands pass inspection, wind them neatly without crushing the wires:
- Use cord reels or notched cardboard: Wrap each string in smooth loops around a plastic reel or a sturdy rectangle cut from shipping boxes with small slits to anchor the plugs.
- Tag strands by destination: Wrap a piece of painter’s tape near the male plug labeled with the exact zone, such as Front Porch Railing or Living Room Tree.
- Respect cord limits next season: Tuck a reminder note inside your light bin noting the U.S. Consumer Product Safety Commission rule to plug no more than three standard-size light sets into a single extension cord.
Artificial trees outlast flimsy retail boxes inside 56-inch tear-resistant nylon bags built for disassembled trees up to 9 or 10 feet tall. Before sliding sections inside, fold branches inward toward the pole and cinch them tightly with wide Velcro straps.
Tag the internal light connectors with masking tape reading Top, Middle, and Bottom so assembly flows effortlessly next year. If your tree includes a heavy metal stand, store the stand and spare wingnuts in a zippered pouch clipped directly to the bag handle.
Wreaths flatten quickly when stacked horizontally under other bins. Choose circular wreath bags—available in diameters ranging from 24 inches to 72 inches—that include an internal suspension hook to hold the wire frame upright without sagging.
Hanging bagged wreaths vertically on wall hooks or pegboards inside a closet or garage frees valuable shelf space.
For wrapping stations, slide paper rolls, flat bags, tissue, tape, and scissors into a double-layered under-bed container—priced near $51—so every supply stays together in one shallow footprint.
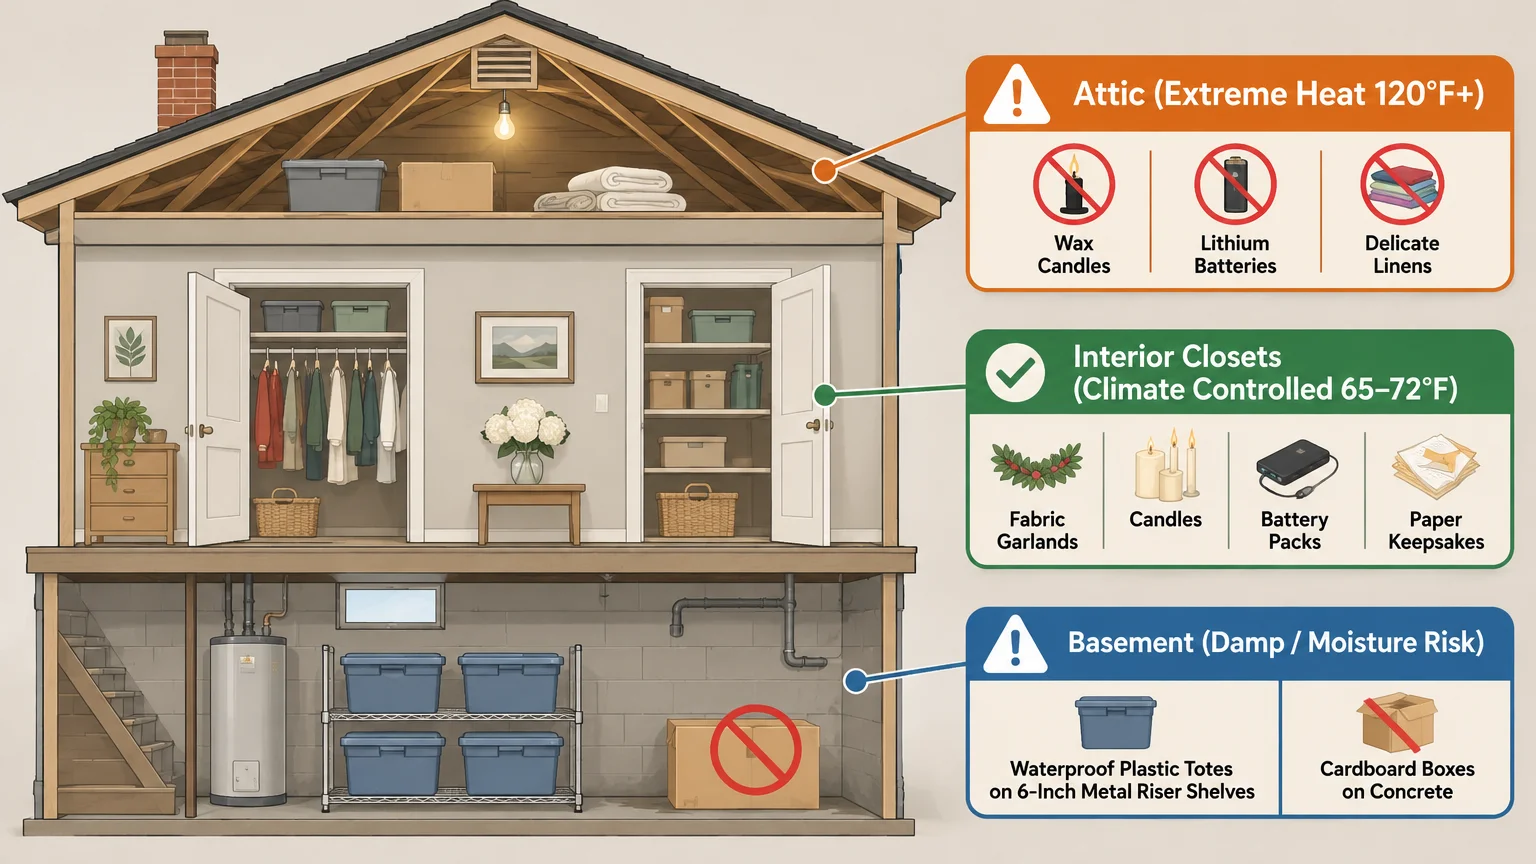
Climate Zoning: Protect Candles, Batteries, and Fabrics from Attic Heat and Damp Basements
Where you place your bins matters just as much as how neatly you pack them. Unconditioned attics and damp basements silently ruin wax, electronics, textiles, and paper keepsakes within a single off-season.
Building science and Energy Star HVAC data confirm that unconditioned or under-insulated attics routinely reach 130 to 150 degrees Fahrenheit on sunny summer days—and 140 to 160 degrees Fahrenheit under dark roof shingles when outdoor temperatures hit 90 to 95 degrees.
Those temperatures easily destroy decorative candles and hand-dipped tapers:
- Soy wax melts between 113 and 130 degrees Fahrenheit.
- Paraffin wax melts between 115 and 154 degrees Fahrenheit.
- Beeswax melts between 144 and 149 degrees Fahrenheit, though sustained heat above 82 degrees already softens and warps pillars.
Keep all candles indoors in a dark closet between 59 and 75 degrees Fahrenheit and below 60% relative humidity, since higher moisture dampens cotton wicks and causes sputtering while sunlight fades colors and fragrance.
Moisture equally threatens wooden nutcrackers, cardboard villages, tree skirts, and stockings. The U.S. Environmental Protection Agency advises keeping indoor relative humidity below 60%—ideally 30% to 50%—to prevent mold growth and drying wet items within 24 to 48 hours.
The Conservation Center for Art & Historic Artifacts notes that paper, wood, and fabric face the highest mold risk when relative humidity reaches 70% to 75% or higher for several days.
If an outdoor wreath or inflatable comes inside damp from winter snow, dry it thoroughly before zipping the storage bag shut.
Batteries inside flameless candles, animated figurines, musical snow globes, and light-up ornaments demand strict removal before storage. Both Energizer and Duracell advise removing batteries from devices stored long-term and removing depleted batteries immediately.
As alkaline batteries discharge over months of storage, internal pressure builds and leaks crusty white potassium carbonate that ruins metal contacts.
Store removed batteries in a cool, dry indoor spot at normal room temperature—never in hot attics and never touching coins or paper clips that cause short-circuiting.
Pay close attention to the small button cells powering remotes, flameless candles, and light-up ornaments.
Energizer and the National Battery Ingestion Hotline (202-625-3333) warn that 20-millimeter coin lithium batteries can cause severe internal injury or death in just two hours if swallowed by a child, so lock them out of reach.
Use this three-zone home placement map to match every item with the right microclimate:
- Zone 1 — Interior Hall or Spare Bedroom Closet: Candles, removed batteries, heirloom glass ornaments, paper garlands, fabric tree skirts, stockings, and under-bed gift wrap cases.
- Zone 2 — Climate-Controlled Finished Basement Shelf: Rigid ornament cases, ceramic village buildings, table linens, and indoor light strings kept elevated off floors.
- Zone 3 — Garage Heavy-Duty Shelving: Artificial tree bags, plastic yard stakes, outdoor extension cords, waterproof inflatables, and locked 27-gallon totes holding non-heat-sensitive plastic decor.
Shelf Spacing, Labeling, and Low-Friction Maintenance Routines
Even top-quality totes slow you down if your shelving forces you to unstack four heavy bins just to reach one box. Designing your storage rack around container geometry keeps retrieval effortless year after year.
Measure shelf clearance before assembling garage racks. Since a standard 27-gallon tote stands roughly 14.7 inches tall, leave a few extra inches of vertical opening so bins slide out cleanly without catching lid latches.
Leave the floor beneath your bottom shelf open rather than resting totes directly on concrete. Elevating bins stops floor condensation from pooling under bags, supports airflow, and lets you sweep or inspect for winter pest entry points along baseboards.
Balance bin weight thoughtfully across shelf heights to protect your back and shoulders:
- Lowest elevated shelf: Heavy 27-gallon totes loaded with glass light strands, cast-iron tree stands, and ceramic village sets.
- Waist-to-chest middle shelves: Frequently accessed tabletop bins, wreath bags, and your open-first hardware kit.
- Top shelf: Lightweight soft-sided ornament boxes, stockings, pillows, and ribbon organizers that never crush anything beneath them.
Avoid pulling heavy containers down from overhead racks, which strains wrists and shoulders unnecessarily—especially for older adults streamlining seasonal chores. Heavy items should always travel horizontally at waist height or lift gently from knee level.
Finish your system with bold, consistent labels on the short end of every bin facing the aisle. Write the target room and zone first in large block letters, followed by a brief inventory summary of what sits inside.
Snap one quick photo of your loaded shelves on your smartphone and save it to a dedicated Holiday Storage album. Next November, you will know within seconds whether the mantel garland sits in the spare closet or behind the garage tree bag.
Finally, park one clear latch box—your Open-First Kit—right at the front of an accessible shelf. Pack extension cords, timers, spare fuses, ornament hooks, adhesive strips, AA batteries, and scissors inside so decorating starts without opening heavy totes.
Your First Step Toward Faster Holiday Setup
Skip trying to overhaul your entire house in one exhausting marathon afternoon. Pick one easy zone right now—such as your entryway console or dining centerpiece—and grab a roll of painter’s tape, a marker, and one sturdy locking bin.
Remove batteries from flameless candles, test accent lights, wrap fragile pieces in unbuffered acid-free tissue, and label the tote front before shelving it.
Once you see how smoothly one bin packs away, the rest of your post holiday cleanup falls easily into place.