
Small household leaks, clogged vents, and dusty coils rarely announce themselves until an appliance breaks down completely. Practicing preventive home maintenance stops that cycle, letting you reduce repair costs while keeping your monthly utility bills predictable.
You do not need a massive toolbox or exhausting weekend projects to protect your house from expensive wear and tear. Focusing on five foundational tasks delivers reliable home maintenance savings without overwhelming your schedule or your joints.
Here is how to tackle the most valuable money-saving home maintenance jobs step by step, along with smart adjustments that make each routine safer and easier to manage.

Why Routine Upkeep Beats Emergency Repairs
Most expensive home emergencies are actually slow-moving problems that started months or years earlier. Heat, friction, and unwanted moisture quietly wear down mechanical parts and building materials until something finally snaps or leaks.
When a major appliance fails unexpectedly, you end up paying premium rates for an emergency service call. Worse, you lose the ability to shop around for replacement equipment or compare contractor quotes calmly.
Adopting practical home upkeep tips puts you back in control of your household budget and your calendar. Instead of reacting to stressful breakdowns, you spend a few quiet minutes each season keeping air and water flowing where they belong.
Good maintenance should also protect your physical energy, not drain it. Every task below includes ergonomic shortcuts and clear boundaries so you know exactly what to handle yourself and when to bring in a professional.
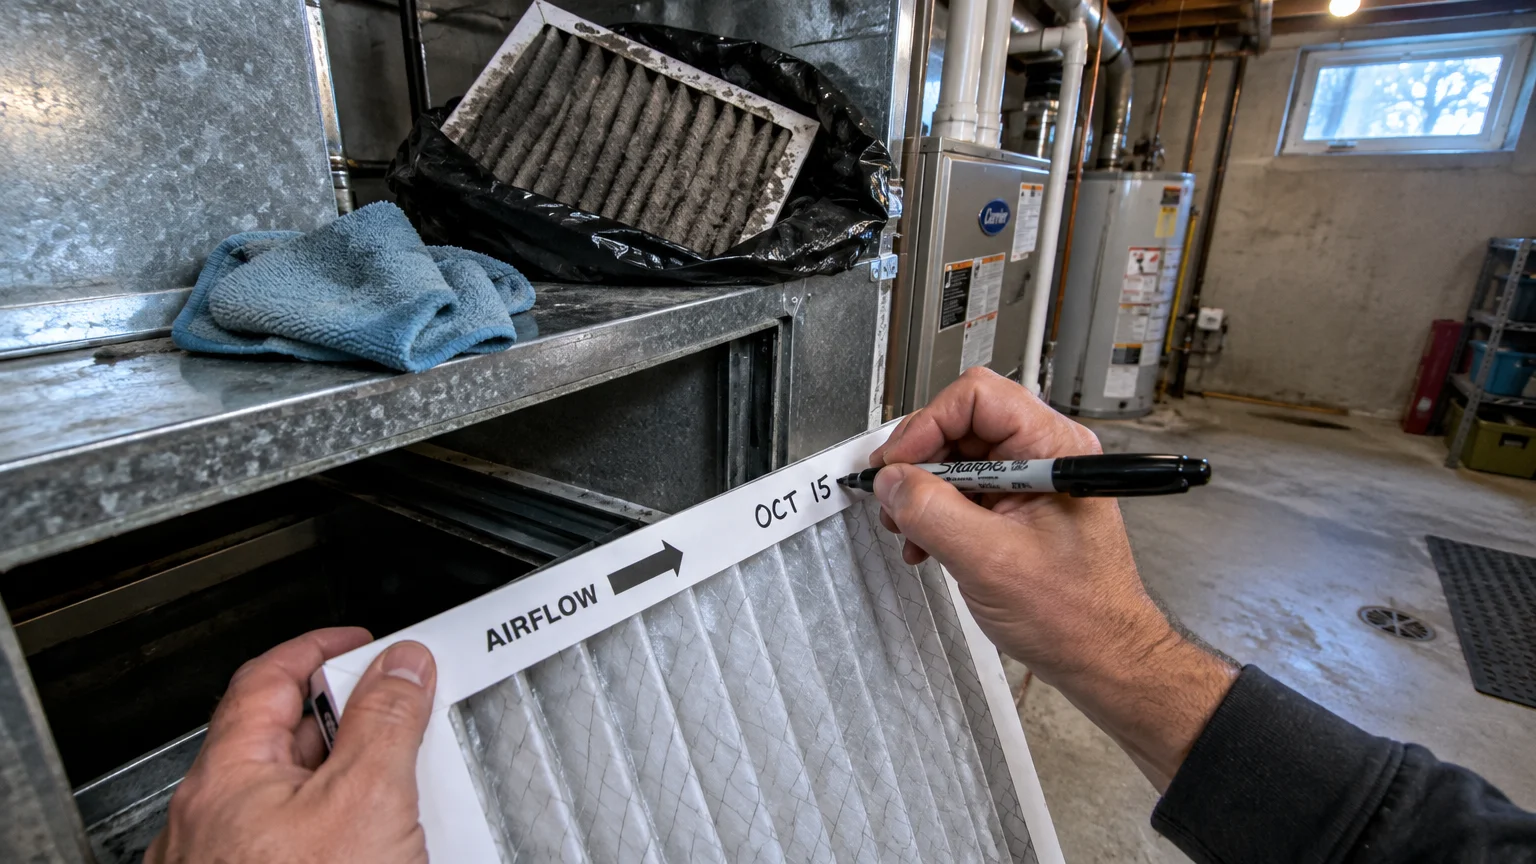
01 Replace Your HVAC Air Filters Before Your System Struggles
Your heating and cooling system is likely the most expensive mechanical setup in your home, and it relies entirely on steady airflow. When the air filter packs full of household dust and pet dander, the blower motor must strain against that resistance.
Restricted airflow traps heat inside the furnace during winter and causes air conditioner evaporator coils to freeze solid during summer. Over time, that constant strain burns out blower motors and compressors long before the end of their normal lifespan.
According to the U.S. Department of Energy, routinely replacing or cleaning your air filters is the most important maintenance task for ensuring your system runs efficiently. A fresh filter lowers energy consumption immediately while keeping abrasive dust off sensitive internal coils.
How to Swap Your Filter Cleanly
Changing an air filter takes very little time once you establish a clean, repeatable routine. Follow these steps to keep loose dust from falling back into your ductwork during the swap.
- Turn your thermostat fan setting to “Off” before opening the filter compartment so the system does not suck loose debris directly into the blower while the slot is open.
- Locate your filter inside the main return air grille on a wall or ceiling, or inside the narrow metal slot next to your furnace or air handler.
- Slide the old filter out slowly and place it directly into a large trash bag to keep captured dust from scattering across your floor.
- Wipe the metal grille and the inside edges of the filter slot with a lightly dampened microfiber cloth to remove clinging dust bunnies.
- Write the current date on the cardboard frame of the new filter using a thick permanent marker so you never have to guess when you installed it.
- Find the printed airflow arrow on the side of the new filter frame and point it toward the blower motor or into the ductwork—never pointing out into the room.
- Slide the new filter into place, latch the cover securely, and return your thermostat to its normal operating setting.
Smart Adjustments for Easier Filter Upkeep
Do not assume that the thickest, most expensive pleated filter on the store shelf is the best choice for your equipment. Ultra-dense allergen filters restrict airflow much faster than standard pleated filters, which can strain older furnaces if not changed frequently.
Check your equipment manual to see what filter thickness and filtration rating the manufacturer recommends. For most homes without severe medical allergies, a mid-grade pleated filter traps plenty of household dust while allowing the blower motor to breathe easily.
If your return air vents are mounted high on the ceiling, climbing a step stool every month or two creates an unnecessary fall hazard. During your next routine service visit, ask your heating technician if they can install a filter rack right on the furnace cabinet at floor level instead.
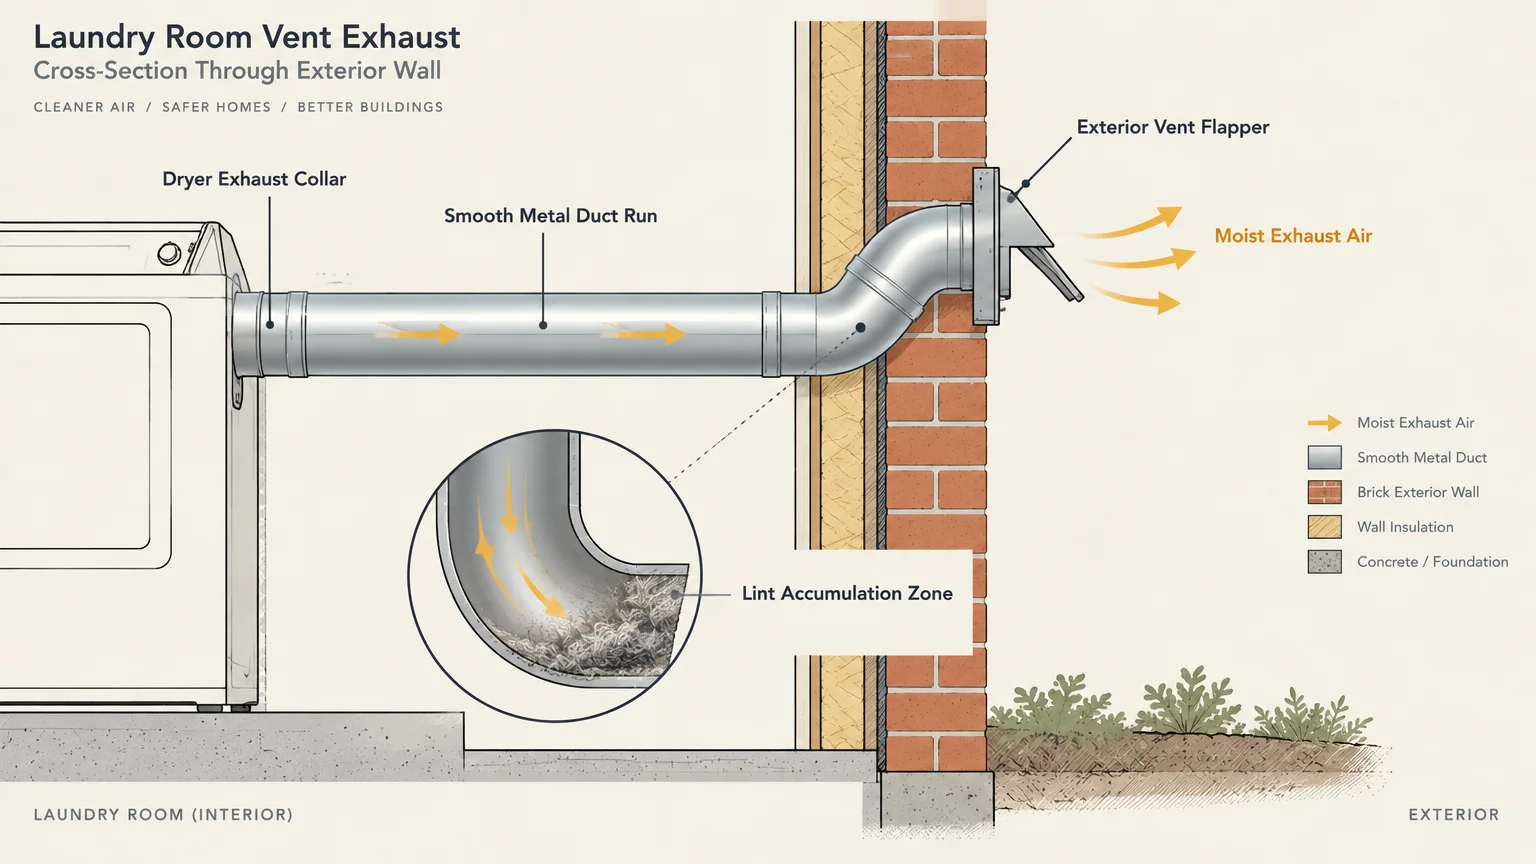
02 Clear Out Your Dryer Exhaust Duct from End to End
Scraping the fuzz off your dryer’s interior lint screen before every load is an essential habit, but that mesh screen only catches part of the debris. Fine lint fibers slip past the trap on every cycle and settle inside the damp exhaust pipe behind the machine.
As that lint layer thickens inside the duct, the hot, moist air from your wet laundry has nowhere to go. Your clothes take two or three cycles to dry instead of one, which drives up your electric or gas bill and cooks the dryer’s heating element and thermal fuse.
Blocked dryer vents are also a serious household safety threat. The U.S. Fire Administration reports that failure to clean out lint is the leading cause of home clothes dryer fires.
Step-by-Step Dryer Vent Deep Clean
You can clear out your dryer’s exhaust path using a vacuum cleaner and an inexpensive flexible rotary brush kit from any hardware store. Set aside a dry afternoon to clean the line from the back of the machine all the way to the exterior wall hood.
- Unplug the dryer power cord from the wall outlet; if you use a gas dryer, turn the gas supply valve shut and pull the machine forward gently so you never stretch or kink the gas pipe.
- Use a screwdriver or nut driver to loosen the metal clamp securing the transition duct to the back of the dryer, then pull the pipe free.
- Reach into the exhaust port on the back of the dryer with a crevice vacuum nozzle to suction out any clumped lint sitting inside the machine housing.
- Insert a long-handled flexible vent brush into the wall duct, sweeping gently and vacuuming up the loosened lint as you pull the brush back out.
- Walk outside to locate the exterior dryer vent hood on the side of your house, remove any lint crusted around the louvers, and verify the damper flaps swing open freely without sticking.
- Reattach the transition duct to the back of the dryer using a metal worm-drive clamp or UL-listed foil tape—never push screws into the duct, as protruding screw tips catch lint and create new clogs.
- Slide the dryer back into place carefully, making sure the transition hose remains straight and uncrushed behind the cabinet before plugging the unit back in.
When to Upgrade Your Transition Hose
While you have the dryer pulled out a few inches, inspect the material of the flexible hose connecting the machine to the wall. If you see flimsy white plastic vinyl or thin foil accordion tubing, replace it immediately.
Soft vinyl and thin foil hoses sag easily, trap lint inside their deep ridges, and crush flat whenever someone pushes the dryer a few inches too far back. Swap that hose for a semi-rigid aluminum duct or an adjustable rigid metal periscope vent, both of which resist crushing and have smoother walls that stay cleaner longer.
If your laundry room sits in the center of your house and the exhaust duct runs up through the roof rather than straight through an exterior wall, skip the DIY brush. Hire a professional vent cleaner with high-powered compressed air equipment to clear vertical roof vents safely.
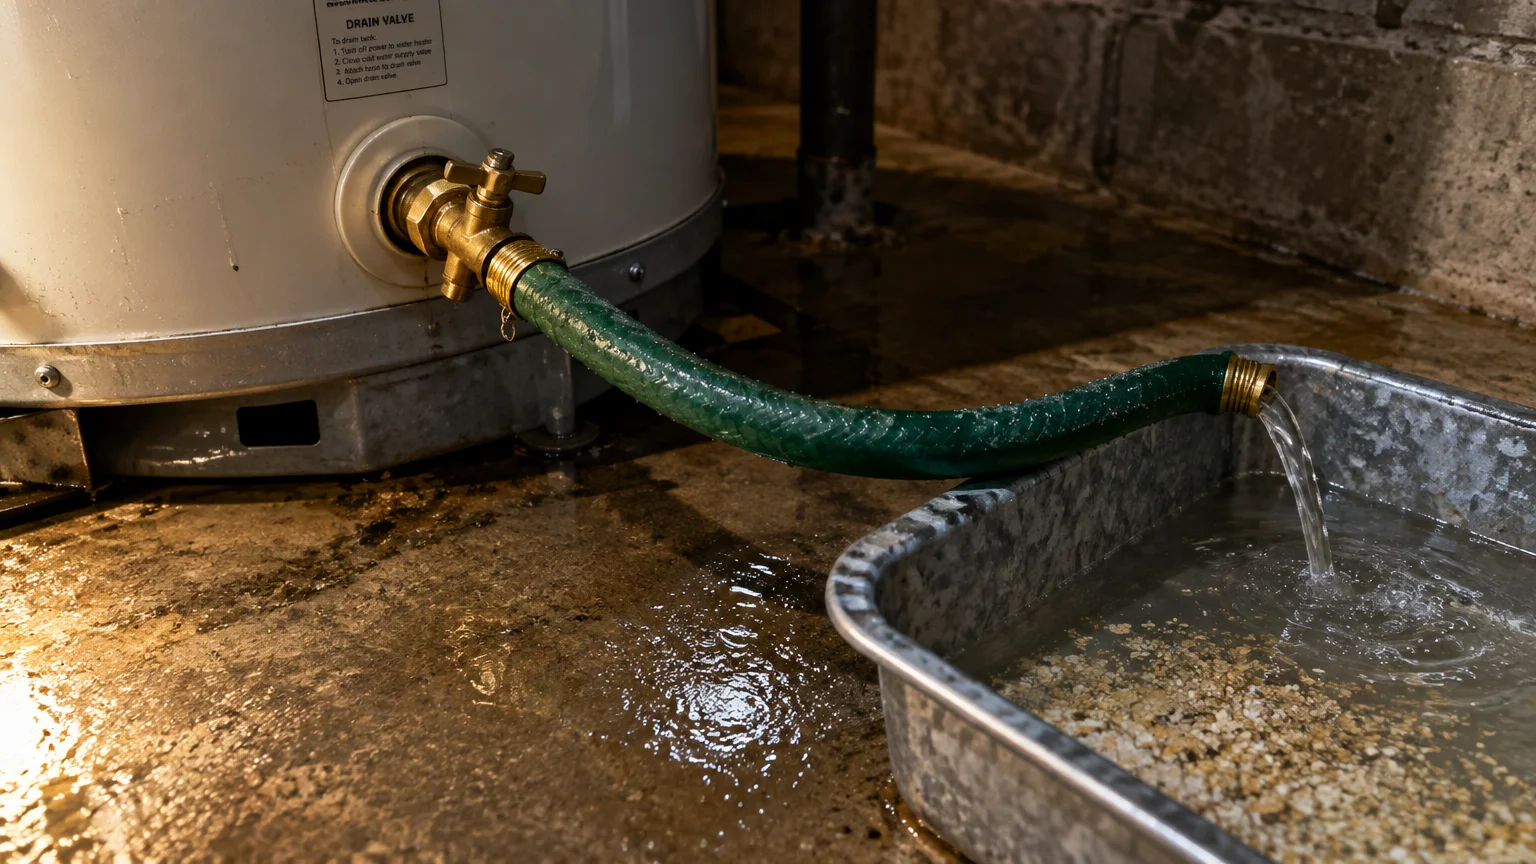
03 Flush Sediment from Your Water Heater Tank
Even clean municipal tap water carries dissolved minerals like calcium and magnesium into your plumbing system every day. When your water heater heats that water, those minerals separate and settle to the bottom of the tank in a sandy layer of sediment.
In a gas water heater, the burner sits directly underneath the tank bottom. A thick blanket of mineral sediment acts like unwanted insulation between the flame and the water, forcing the burner to run longer while overheating and weakening the steel tank floor.
In an electric water heater, accumulating scale can climb high enough to bury the lower heating element, causing it to burn out prematurely. Draining a few gallons of water from the bottom valve flushes out loose silt before it bakes into hard rock scale.
How to Flush Your Tank Safely
Flushing a standard tank water heater requires nothing more than a garden hose, a flathead screwdriver or work gloves, and careful attention to water temperature. Always follow the shutdown steps in order to protect both your skin and your heating elements.
- Turn off the heat source completely: switch off the dedicated circuit breaker in your electrical panel for an electric unit, or turn the thermostat dial on a gas unit to the “Pilot” setting.
- Never turn power back on to an electric water heater while the tank is partially empty, or the exposed upper heating element will burn out in seconds.
- Thread a standard garden hose onto the drain spigot near the bottom of the water heater tank, tightening the brass coupling snugly by hand.
- Run the open end of the garden hose into a basement floor drain, a deep utility sink, or outdoors onto gravel where hot water will not harm grass or plants.
- Turn the cold water supply valve above the water heater to the closed position, then open a hot water faucet at a kitchen or bathroom sink to break the vacuum inside the plumbing lines.
- Open the drain valve at the bottom of the tank slowly—wearing gloves to protect against scalding water—and let the water run until the rusty, gritty flow turns completely clear.
- Close the tank drain valve tightly, unscrew the garden hose, and turn the cold water supply valve above the tank back on so the tank refills.
- Walk over to the open sink faucet and let it sputter and hiss as trapped air escapes the lines; once a smooth, steady stream of water flows from the faucet, close the tap and restore power or gas to the heater.
A Crucial Warning About Older Drain Valves
Before you force a water heater drain valve open, look closely at what it is made of and think about when it was last turned. Many builder-grade water heaters come equipped with inexpensive plastic drain valves rather than solid brass spigots.
If a tank has gone many years without being flushed, hard mineral chunks can lodge inside that plastic valve when you open it, preventing it from closing all the way again. Worse, aged plastic becomes brittle from constant heat and can snap off in your hand.
If your water heater is old, has never been drained, and features a plastic drain valve, do not force it open on a weekend afternoon. Wait until you have a plumber visiting for another routine job and ask them to flush the tank and install a durable brass ball valve with a metal cap.
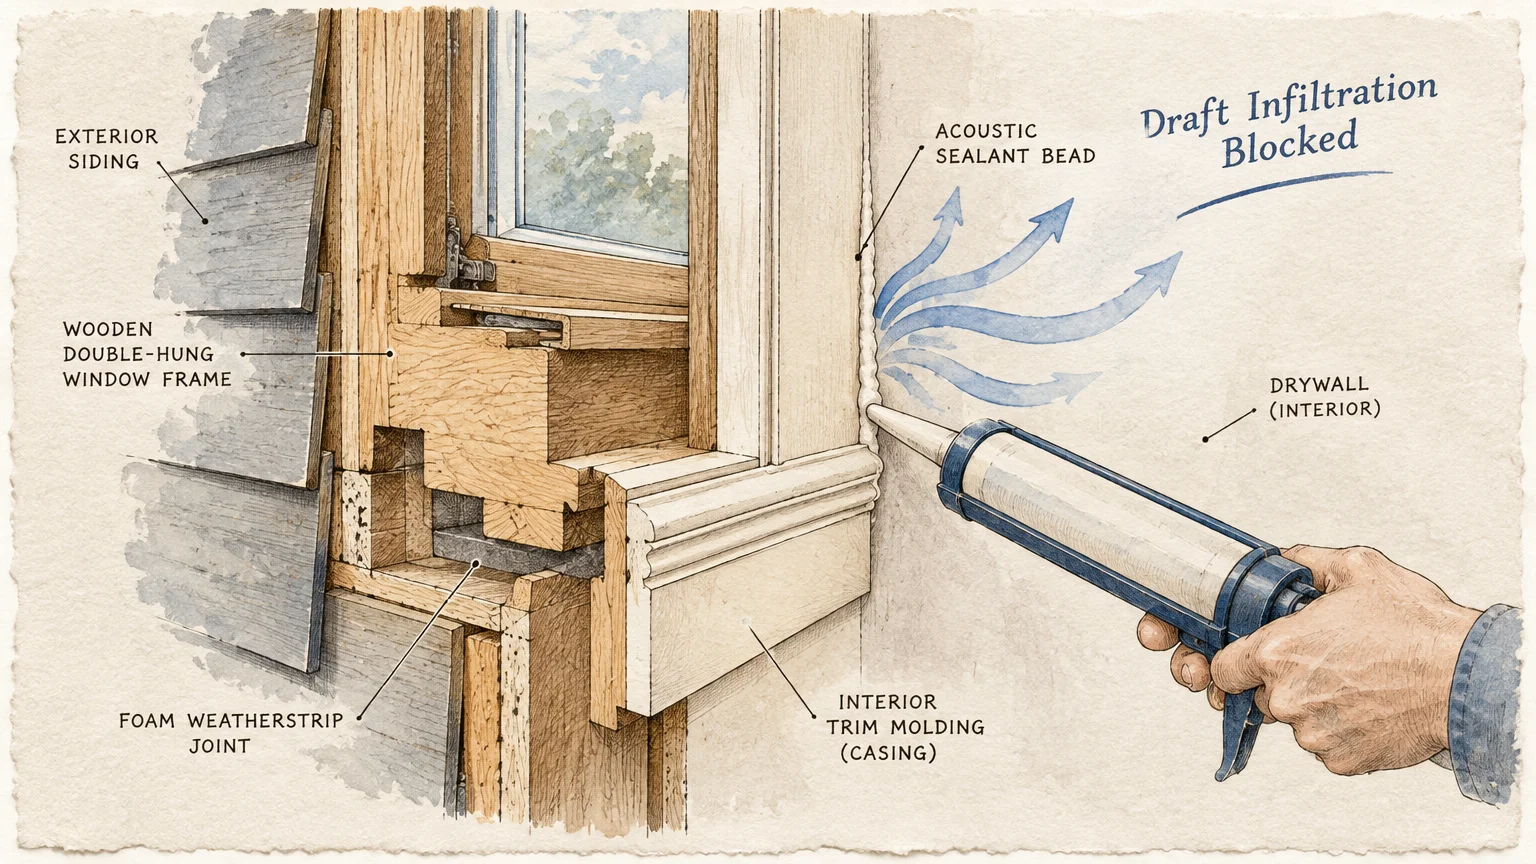
04 Seal Air Leaks Around Windows, Doors, and Plumbing Penetrations
Your house expands and contracts slightly with every change in temperature and humidity, which gradually cracks old caulk and flattens door seals. Those tiny gaps around window trim, door jambs, and baseboards add up to the equivalent of leaving a window cracked open all year.
Conditioned air escapes right through those cracks, forcing your furnace and air conditioner to run extra cycles every single hour. Even more concerning, exterior gaps around window frames let wind-driven rain seep behind your siding, rotting out wooden sills and wall framing out of sight.
According to ENERGY STAR guidance on sealing and insulating, sealing uncontrolled air leaks is one of the highest-return projects for improving home comfort and trimming utility bills. Better still, you can complete all the work standing firmly on the floor with simple hand tools.
Where to Find and Seal Costly Gaps
Take twenty minutes on a breezy day to walk from room to room inspecting the boundaries where your indoor living space meets the outdoors or unconditioned spaces. Focus on these five high-impact spots to block drafts, moisture, and pests at once.
- Test exterior door weatherstripping with a sheet of paper: Close a piece of notebook paper or a crisp bill in your front and back doors; if you can pull the paper out easily without feeling firm drag, peel off the flattened foam or rubber seal inside the jamb and press new adhesive-backed silicone bulb weatherstripping into place.
- Replace tattered door sweeps at the threshold: Kneel or sit on a low stool to check the bottom edge of every exterior door, Including the door leading into your attached garage; if you see daylight underneath, slide on or screw in a fresh vinyl door sweep that brushes lightly against the threshold.
- Apply V-strip weatherstripping to drafty window sashes: Clean the side tracks and bottom sill of loose double-hung or sliding windows with rubbing alcohol, let the surface dry completely, and press folded vinyl V-strip along the channels to block rattling drafts without gluing the window shut.
- Re-caulk cracked exterior window and door trim: Scrape away brittle, peeling exterior caulk around ground-floor window frames using a plastic putty tool, wipe the gap clean, and run a smooth bead of paintable exterior polyurethane or silicone caulk along the top and side seams to keep rainwater out of the wall.
- Close plumbing gaps inside kitchen and bathroom cabinets: Open the cabinet doors beneath your sinks and look closely at where the hot, cold, and drain pipes pass through the back wall; pack wide gaps with copper mesh and seal them with expandable foam or caulk so humid crawlspace air and mice cannot travel up along the pipes.
Ergonomic Tools for Effortless Caulking
Standard manual caulk guns require repetitive hand squeezing that quickly tires out your wrists and fingers, especially if you deal with arthritis. When your hand gets tired, the caulk bead turns bumpy and uneven, creating a mess to clean up.
For small indoor touch-ups around baseboards and bathroom sinks, skip the bulky caulk gun altogether and buy squeezable toothpaste-style tubes of silicone sealant. For larger exterior window sealing jobs, invest in an inexpensive battery-powered caulk gun that dispenses a smooth, steady ribbon at the press of a trigger with zero hand strain.
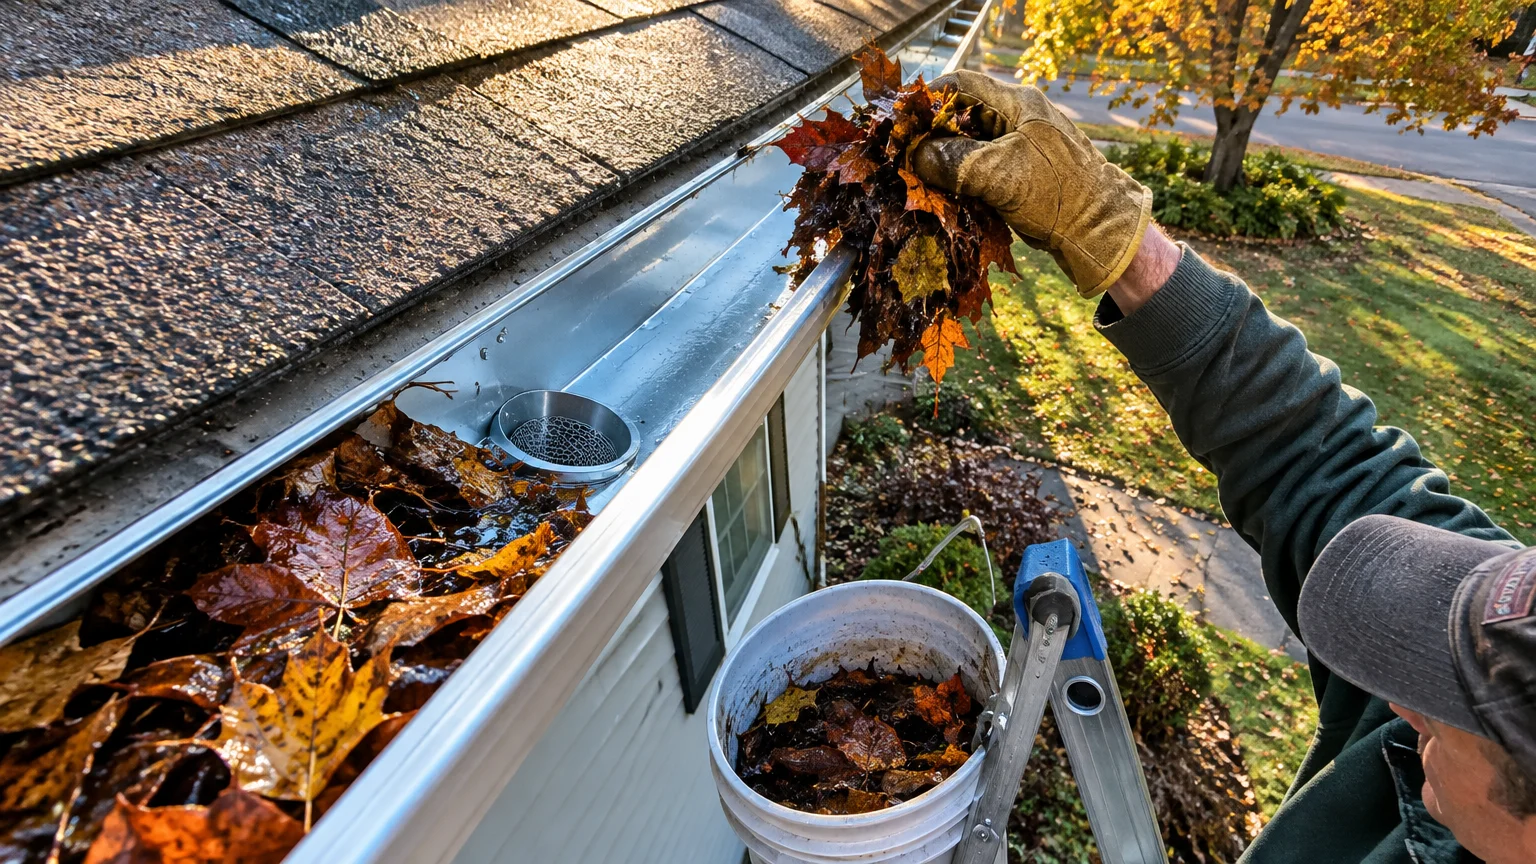
05 Keep Gutters, Downspouts, and Drainage Paths Clear
Water is the single most destructive force your home faces, and your gutter system is your primary shield against it. Every time it rains, your roof sheds a massive volume of water that must travel cleanly down the gutters and away from the structure.
When wet leaves, pine needles, and shingle granules clog your gutters or downspouts, rainwater backs up and pours right over the edges. At the roofline, that trapped water rots out wooden fascia boards, stains soffits, and creeps under roof shingles to cause ceiling leaks.
Down on the ground, water dumping next to your exterior walls saturates the soil against your foundation, leading to cracked basement walls, shifting slabs, and damp crawlspaces. The U.S. Environmental Protection Agency (EPA) stresses that controlling moisture entry is the key to preventing indoor mold growth and protecting both your home’s structure and your respiratory health.
Ground-Level Drainage Fixes You Can Do Safely
You do not have to climb onto your roof to solve many of the worst gutter and drainage mistakes around a house. Half the battle happens right at ground level where downspouts discharge rainwater onto your property.
- Add downspout extensions to carry water past the flowerbeds: Many downspouts end right at the corner of the house, dumping gallons of water directly onto the soil touching the foundation; snap on hinged metal or rigid plastic downspout extensions so water releases onto sloped turf well away from the walls.
- Realign shifted splash blocks after storms or yard work: Walk the perimeter of your home to check the concrete or plastic trays sitting beneath each downspout elbow; slide displaced blocks back into position and make sure the open end slopes downhill away from the siding.
- Clear leaves off ground-level grates and window wells: Use a light garden rake to pull matted leaves off driveway channel drains, patio drains, and basement window well covers so heavy rain can drain freely instead of pooling against basement glass.
- Inspect gutter performance from the ground during a steady rain: Put on a rain jacket and take a five-minute walk around your house while it is actively raining; look up from a safe distance to spot any waterfall spills over gutter edges or water dripping from behind the gutter trough, which pinpoints exactly where a clog or loose hanger sits.
Drawing a Firm Line on Ladder Safety
Cleaning high gutters from an extension ladder is one of the most dangerous household tasks you can attempt. Balancing on metal rungs while leaning sideways to scoop wet muck shifts your center of gravity and causes severe falls every single autumn.
If you have a single-story ranch home, you can clear dry leaves safely with both feet planted on the ground by using a curved telescoping wand attachment connected to a leaf blower or garden hose. If you have a two-story home, steep terrain, or heavy wet debris, treat professional gutter cleaning as a smart investment that costs a tiny fraction of a hospital visit or a foundation repair.

How to Organize Your Home Upkeep Without Feeling Overwhelmed
The biggest barrier to consistent preventive home maintenance is rarely the difficulty of the task itself. More often, we procrastinate because we cannot remember when we last did the job, or because the tools we need are buried across three different closets.
You can eliminate that friction by pairing a simple seasonal schedule with a single, well-organized maintenance tote. Use the reference table below to pace your five core upkeep jobs across the year and decide when to handle a task yourself versus calling a technician.
| Maintenance Job | Ideal Check Schedule | Supplies to Keep on Hand | When to DIY vs. Call a Pro |
|---|---|---|---|
| 1. HVAC Air Filter Swap | Check every month during peak heating or cooling seasons; swap when visibly gray or dusty. | Box of correct-size pleated filters, thick permanent marker, microfiber cloth, trash bag. | DIY: Wall or furnace cabinet slots you can reach from the floor. Call a Pro: High vaulted ceiling vents or ask a tech to relocate the filter slot to the furnace. |
| 2. Dryer Exhaust Duct Cleaning | Inspect exterior flap seasonally; deep-clean the interior duct once a year. | Screwdriver or nut driver, vacuum with crevice tool, flexible rotary dryer vent brush, metal foil tape. | DIY: Short, straight vent runs that exit directly through a ground-floor exterior wall. Call a Pro: Long ducts with multiple turns or vertical vents that exit through the roof. |
| 3. Water Heater Tank Flush | Once a year to prevent loose mineral silt from hardening into scale. | Dedicated utility garden hose, heat-resistant work gloves, flathead screwdriver (if required by valve). | DIY: Tanks maintained regularly with smooth-turning brass drain valves. Call a Pro: Older neglected tanks with brittle plastic drain valves that might snap or stick open. |
| 4. Window & Door Air Sealing | Inspect in early autumn before cold weather arrives and in spring after winter freezes. | Silicone bulb weatherstripping, vinyl V-strip, exterior paintable caulk, plastic scraper, rubbing alcohol. | DIY: All ground-floor doors, accessible windows, and under-sink pipe gaps. Call a Pro: Second-story exterior window trim or rotted wooden sills that need carpentry replacement. |
| 5. Gutter & Drainage Upkeep | Late spring after seed pods fall and late autumn after trees drop their leaves. | Work gloves, garden rake, downspout extensions, telescoping ground-level hose wand. | DIY: Ground-level downspout extensions, splash blocks, surface grates, and wand cleaning. Call a Pro: Any gutter cleaning or hanger repair that requires climbing an extension ladder. |
Build a Grab-and-Go Home Upkeep Caddy
Instead of hunting through a crowded garage shelf every time a window rattles or a filter needs changing, assemble a dedicated maintenance kit. Store a clear plastic storage bin on a waist-high utility shelf stocked with these basic supplies so you are always ready for quick fixes.
- An index card taped inside the lid: Write down the exact dimensions of every HVAC air filter in your house, the model numbers of your water heater and dryer, and the dates you last flushed the tank and cleaned the dryer vent.
- A dedicated short garden hose: Keep a clean, lightweight utility hose coiled exclusively for flushing your water heater so you never have to drag a muddy outdoor garden hose through your house.
- Sealing and weatherstripping basics: Stock one squeezable tube of clear silicone caulk, one roll of adhesive foam or bulb weatherstripping, a plastic putty scraper, and a roll of UL-listed metal foil tape.
- Visibility and marking tools: Include a bright LED headlamp or magnetic flashlight that keeps both hands free when looking behind appliances, alongside a black permanent marker for dating filters.

Your Fifteen-Minute Next Step for Today
Do not try to tackle all five maintenance jobs in a single afternoon. Pick the easiest, zero-cost inspection right now to build momentum and see exactly where your home stands.
Walk over to your main HVAC return vent to check the size and condition of your current air filter, snapping a clear photo of the printed dimensions on the cardboard frame with your phone. On your way back, peek behind your clothes dryer to see whether it uses a safe rigid metal duct or an old plastic accordion hose that needs upgrading.
Once you have that information on your phone, you can pick up the exact filter size and supplies you need on your next routine errand—setting yourself up for lower utility bills and fewer repair surprises all year long.