A clean home requires more than just wiping countertops and sweeping floors—the real grime often hides in places you never think to check. When you ignore hidden dirt catchers like appliance filters and mattress seams, you allow allergens, bacteria, and wasted energy to build up over years. Tackling these overlooked areas instantly improves your indoor air quality and helps expensive appliances run efficiently. You do not need specialized equipment to handle these forgotten chores; basic household supplies will do the trick. Read on to discover the seven dirtiest items hiding in plain sight and learn the simple, actionable steps to finally get them clean.

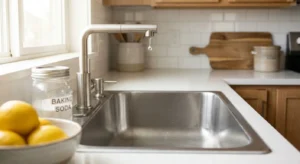
The Dishwasher Filter: A Breeding Ground for Bacteria
The modern dishwasher operates quietly and efficiently, leading many homeowners to assume the appliance cleans itself during every cycle. Unfortunately, this assumption causes a significant maintenance blind spot. Every time you run a load, heavy grease, soap scum, and microscopic food debris wash off your plates and travel to the bottom of the tub. Instead of grinding up this waste like older, louder models did, modern dishwashers rely on a removable mesh filter to catch the sludge before it circulates back onto your dishes.
When you ignore this filter for months or years, the trapped food particles begin to rot in a dark, damp, and warm environment. This neglect drastically reduces the appliance’s water flow, preventing the internal spray arms from generating enough pressure to adequately rinse your dishes. 
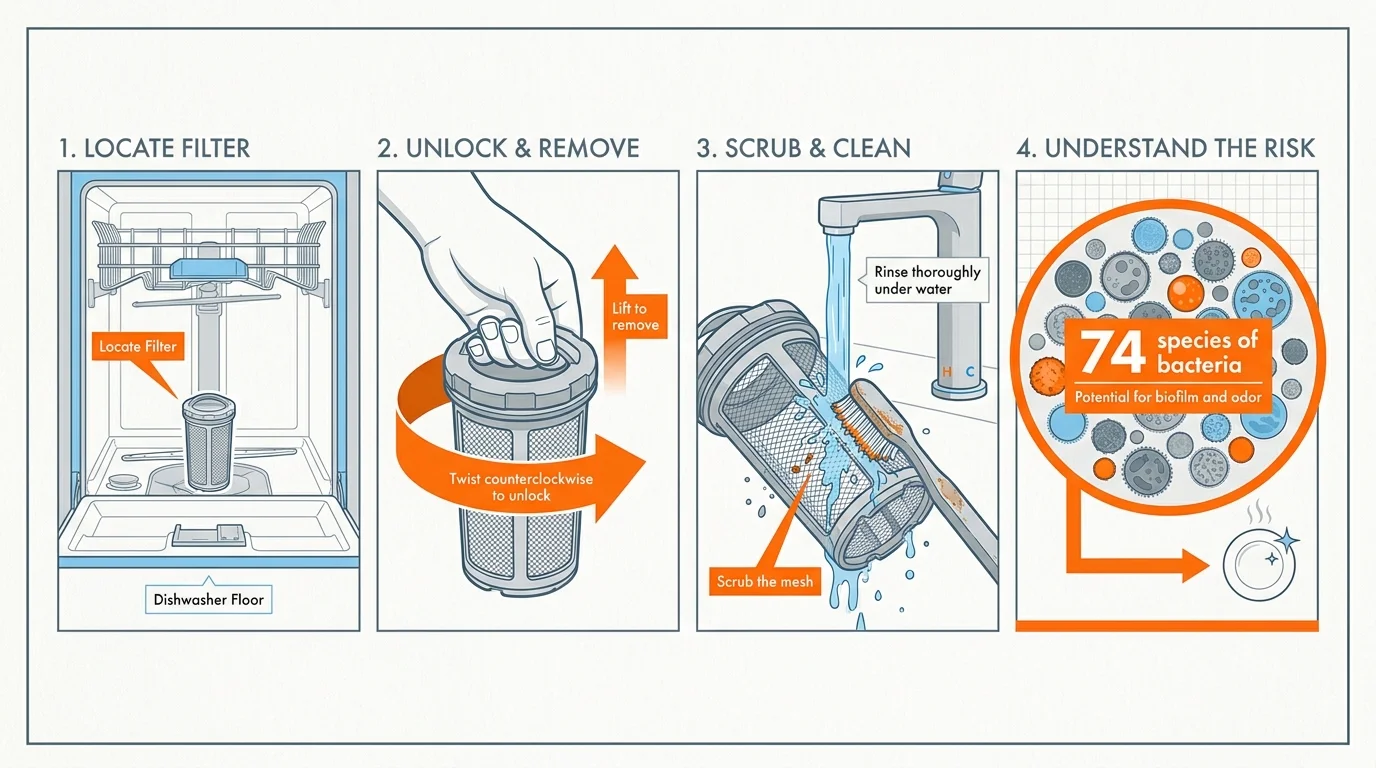
More alarmingly, a clogged filter turns your appliance into a biohazard. According to WebMD, a dirty dishwasher can harbor up to 74 species of bacteria, including dangerous strains that pose severe health risks to your household. These microorganisms easily transfer onto the very plates and utensils you eat with.
Tackling this forgotten chore requires no special tools and takes less than five minutes of your time.
- Locate the filter: Pull out the bottom dish rack and look for a cylindrical plastic piece set into the floor of the washing tub.
- Remove the mechanism: Twist the top of the filter counterclockwise to unlock it, then lift it straight out. Check for a flat secondary mesh plate underneath and remove that as well.
- Scrub the mesh: Take the filter components to your kitchen sink. Use an old toothbrush and warm, soapy water to gently scrub away the compacted grease and food bits. Avoid using wire brushes, which easily tear the delicate mesh.
- Rinse and replace: Rinse the filter thoroughly under hot running water, place it back into the floor of the dishwasher, and twist it clockwise until it locks firmly into place.

Refrigerator Condenser Coils: The Hidden Energy Drain
Your refrigerator runs constantly, working around the clock to remove heat from the interior food compartments. It exhausts this trapped heat through the condenser coils, which usually sit behind a base grille near the floor or stretch across the back panel of the appliance. Because these coils sit out of sight, they quietly collect a thick, dense blanket of pet hair, dust bunnies, and airborne cooking grease.
When debris coats the coils, they lose their ability to release heat efficiently. This forces the refrigerator’s compressor to run longer and harder to maintain safe food storage temperatures. Over time, this excessive strain leads to premature mechanical failure and significantly drives up your monthly electric bill. In fact, Angi reports that spending just fifteen minutes cleaning your condenser coils yields an average energy savings of 11 percent. If you own shedding pets, your coils clog much faster, meaning your financial losses run even higher.
You can protect your appliance and lower your energy costs by performing a simple cleaning routine every six to twelve months.
- Cut the power: Unplug the refrigerator from the wall outlet to ensure your safety and prevent shocks.
- Access the coils: If your coils sit at the bottom, snap off the front base grille. If they sit at the back, carefully roll the refrigerator away from the wall.
- Loosen the debris: Use a long, flexible coil-cleaning brush to knock the compacted dust and pet hair loose from between the tight metal grids.
- Vacuum the mess: Attach a narrow crevice tool to your vacuum cleaner and suck away the dislodged dirt. Move slowly to capture as much dust as possible.
- Restore power: Replace the grille or roll the fridge back into place, then plug the power cord back into the wall outlet.

Your Mattress: A Magnet for Dust Mites and Allergens
You spend roughly a third of your life sleeping on your mattress, making it the most heavily used piece of furniture in your home. Night after night, your body sheds millions of microscopic dead skin cells, secretes natural oils, and releases moisture through sweat. While you routinely wash your bed sheets, standard fabrics do not stop this organic debris from sifting deep into the padded layers of your mattress.
This accumulation creates a limitless food source for dust mites. These microscopic arthropods thrive in the warm, humid environment of your bed. Data from the National Center for Healthy Housing shows that a single female dust mite lays up to 100 eggs, and these pests live for two to four months. As they multiply, they produce a massive volume of waste products. Inhaling this waste triggers year-round allergy symptoms, including morning congestion, itchy eyes, and asthma flare-ups.
Deep cleaning your mattress removes the allergens and neutralizes the lingering odors that build up over years of use.
- Strip the bed completely: Remove the sheets, blankets, and standard mattress pad. Wash them all in hot water.
- Vacuum the surface: Attach a clean upholstery tool to your vacuum. Work in slow, overlapping lines across the entire top of the mattress. Pay special attention to the piping and deep seams where skin cells gather.
- Apply a baking soda treatment: Sift a generous, even layer of baking soda over the mattress. The alkaline properties of the baking soda neutralize acidic sweat odors and draw out trapped moisture.
- Let it sit: Allow the baking soda to rest undisturbed for at least one hour. For heavily soiled mattresses, leave it on for several hours.
- Vacuum again: Slowly vacuum up the powder.
- Protect your work: Install a high-quality, waterproof, and allergen-proof mattress encasement before putting your clean sheets back on.

The Showerhead: A Slime-Coated Bacteria Trap
You step into the shower to wash away the day’s dirt, trusting that the water falling on you is entirely clean. However, the fixture delivering that water frequently hides deeply unsettling secrets. Depending on your local water supply, hard mineral deposits slowly build up inside the tiny rubber nozzles. This scale blocks the water flow and causes the spray to shoot out at erratic, messy angles.
While mineral scale causes annoying water pressure issues, the biological buildup inside the showerhead poses a much greater concern. The dark, damp, and warm interior provides a perfect breeding ground for thick bacterial biofilms. Research published by the National Institutes of Health reveals that showerhead biofilms heavily enrich non-tuberculous mycobacteria, presenting a significant exposure risk when aerosolized. Specifically, the pathogen Mycobacterium avium creates a tough, waxy biofilm that actively resists the chlorine used in municipal water supplies. When you turn on the hot water, the steam carries these aerosolized bacteria directly into your lungs.
Avoid harsh chemical bleach, which struggles to penetrate the waxy biofilm. Instead, rely on the acidic power of white vinegar to dissolve both the hard scale and the bacterial slime.
- Prepare a soaking bag: Fill a sturdy, leak-proof plastic bag with equal parts distilled white vinegar and water.
- Submerge the fixture: Pull the bag up and over the showerhead so the fixture is completely submerged in the liquid.
- Secure the bag: Wrap a thick rubber band, a zip tie, or a strong hair tie around the neck of the shower pipe to hold the bag tightly in place.
- Wait for the acid to work: Leave the bag attached for exactly one hour. Do not exceed an hour if your fixture features a delicate brass or nickel finish, as prolonged acid exposure can cause dulling.
- Scrub and flush: Remove the bag and dump the liquid. Use a small cleaning toothbrush to scrub the loosened scale off the nozzles. Finally, run the hot water on full blast for two minutes to flush out the internal debris.

Range Hood Grease Filters: A Silent Fire Hazard
Every time you fry bacon, sear a steak, or sauté vegetables, your cookware releases a plume of steam, smoke, and aerosolized cooking oils. Your overhead range hood captures these airborne particles to vent them safely outside or filter them back into the room. The metal mesh panels sitting directly underneath the hood act as the primary defense line, catching the heavy grease before it coats your kitchen walls.
Over years of daily cooking, these metal filters collect an incredible amount of oil. The heat from your stove causes the trapped oil to undergo a chemical process called polymerization, turning the liquid grease into a hardened, sticky, yellow resin. Once the filters clog completely, your range hood loses its ability to ventilate the kitchen. Smoke alarms trigger more frequently, and cooking odors linger for days. More dangerously, a neglected, grease-choked filter hovering directly above an open flame serves as a severe fire hazard.
Standard dishwasher cycles rarely generate enough heat or alkaline power to strip polymerized resin. You need a dedicated boiling method to melt the grease away.
- Remove the filters: Push the small release latches on the filters and slide the metal mesh panels out of the range hood.
- Boil water: Bring a large, wide pot of water to a rolling boil on your stove.
- Add the cleaning agent: Slowly and carefully pour half a cup of baking soda into the boiling water. The water will fizz and foam rapidly as the baking soda reacts.
- Submerge and melt: Using tongs, lower the greasy filters into the boiling alkaline solution. Let them sit for three to five minutes. You will immediately see the water turn brown as the sticky resin melts away.
- Rinse and dry: Carefully remove the hot filters, rinse them under hot tap water to remove any lingering residue, and let them air dry completely before reinstalling them.

Washing Machine Rubber Seals and Filters: The Source of Musty Odors
Washing machines handle your dirtiest, sweatiest clothing, yet most people rarely stop to wash the machine itself. This oversight proves especially disastrous for high-efficiency, front-loading washers. To prevent water from leaking onto your floor, front loaders utilize a thick, heavy-duty rubber gasket around the door. While this gasket creates a watertight seal, its deep folds easily trap stagnant water, lint, pet hair, and excess fabric softener.
When you close the door between laundry days, you trap that moisture inside a dark drum. Mold and mildew immediately begin to colonize the rubber folds. This fungal growth produces a distinctive, sour, musty odor that transfers directly onto your freshly washed towels and clothes. Furthermore, the drain pump filter—hidden behind a small access panel at the bottom corner of the machine—quietly catches coins, keys, hairpins, and clumps of lint. A blocked drain pump filter causes water to drain slowly, leaving your clothes soaking wet at the end of the spin cycle.
Implement a monthly maintenance checklist to keep your washing machine smelling fresh and draining perfectly.
- Wipe the gasket: Peel back the thick folds of the rubber door seal. Use a microfiber cloth soaked in white vinegar or warm soapy water to wipe away the gray sludge, hair, and mold spores hiding inside the crevice.
- Clear the drain pump filter: Place a shallow baking pan or a thick towel directly under the access door to catch the inevitable rush of trapped water. Unscrew the filter cap, pull out the plastic cylinder, and pick out any debris. Rinse the filter under the sink before screwing it back in tightly.
- Run a cleaning cycle: Place a commercial washing machine cleaning tablet directly into the empty drum, or pour half a cup of liquid chlorine bleach into the detergent dispenser. Run the machine on its longest, hottest cycle to sanitize the internal hoses and drum.
- Change your daily habits: Never close the washing machine door immediately after finishing a load. Leave it cracked open to allow the interior moisture to evaporate completely.

Baseboards and Door Frames: The Forgotten Dust Collectors
Because baseboards and door frames blend seamlessly into the architectural background of your home, they remain incredibly easy to overlook during a regular cleaning session. However, because these trim pieces protrude slightly from the flat surface of the wall, they act as tiny ledges that catch a continuous shower of airborne dust, lint, and pet dander.
When left untouched for years, this loose dust mixes with ambient household moisture to form a dark, sticky film. Scuff marks from shoes and vacuums compound the mess. While you might not consciously notice the dirty baseboards when you walk into a room, the dark perimeter quietly makes your entire living space feel neglected, dingy, and old. Cleaning these simple architectural details immediately brightens the room, makes your freshly mopped floors look sharper, and removes a massive amount of hidden allergens from your breathing zone.
To clean them efficiently, you must follow a two-step process. If you apply water directly to thick dust, you simply create a stubborn mud that smears across the paint.
- Remove the dry debris: Use a dry microfiber duster, a vacuum cleaner with a soft brush attachment, or even a dry paint brush to sweep the loose particles off the ledges. For a clever preventative trick, run an old dryer sheet over the baseboards; the anti-static properties of the sheet will actively repel future dust.
- Wash the trim: Fill a small bucket with warm water and a few drops of liquid dish soap. Dip a sponge or microfiber cloth into the solution and wring it out until it is only slightly damp.
- Wipe and dry: Wipe away the sticky residue and scuff marks. Follow up immediately with a dry towel to prevent the excess water from soaking into the wood or damaging the paint finish.
Your next step is simple: pick just one item from this list to tackle today. Grab your white vinegar or baking soda, set a ten-minute timer, and restore a forgotten corner of your home to its rightful, hygienic state.


