You can cut your grocery bill and shave twenty minutes off your weekly shopping trip just by changing how you label your pantry. A smart labeling system instantly shows you what you own, what you are running out of, and what has expired. Stop buying duplicate boxes of pasta and throwing away forgotten, stale crackers. A well-labeled pantry shifts your kitchen from chaotic to calm, making meal planning straightforward. Whether you want to simplify your daily routines or just need a home that practically manages itself, clear labels make maintaining your inventory effortless. Choose from these ten highly effective labeling systems to organize your shelves and make your next grocery run entirely stress-free.
1. Pre-Printed Minimalist Decals for Clear Containers
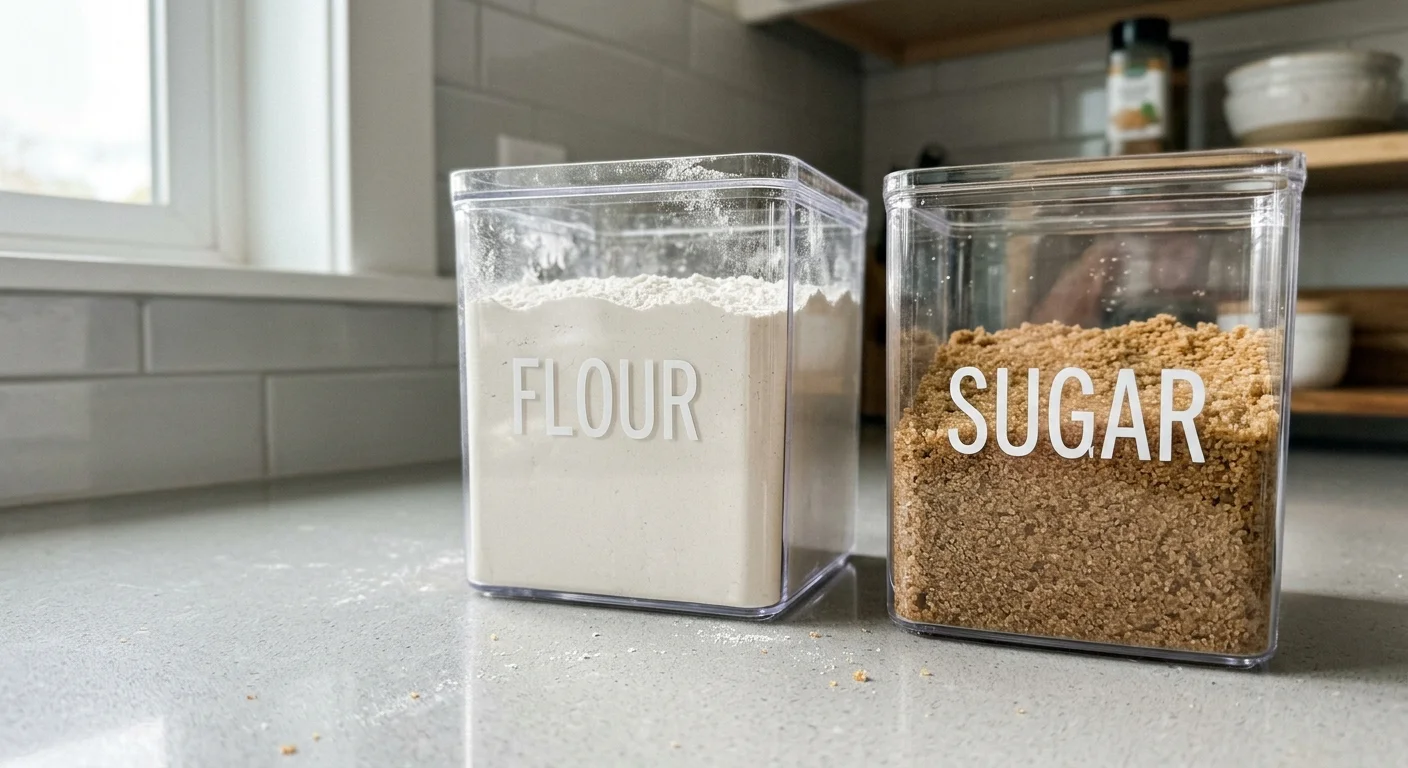
Because cardboard boxes come in wild colors, flashing fonts, and varied shapes, they make the pantry look visually cluttered and obscure how much product actually remains inside. Decanting your staple dry goods—like flour, rice, and oats—into clear acrylic or glass containers solves this immediately, provided you use a uniform labeling system. Pre-printed decals offer an elevated, minimalist aesthetic that calms the eye and standardizes your shelves.
This streamlined approach drastically improves your grocery shopping experience. When you write your weekly list, you simply scan the clear, beautifully labeled jars. If the pasta container is below the halfway mark, you add it to the list without having to shake a cardboard box to guess the volume. When you transfer your food into plastic bins, always verify that the material is safe. The Mayo Clinic warns that Bisphenol A (BPA) can seep into food from certain plastic containers, potentially leading to adverse health effects on the brain and prostate gland. Always check for explicitly labeled BPA-free storage products before organizing your goods.
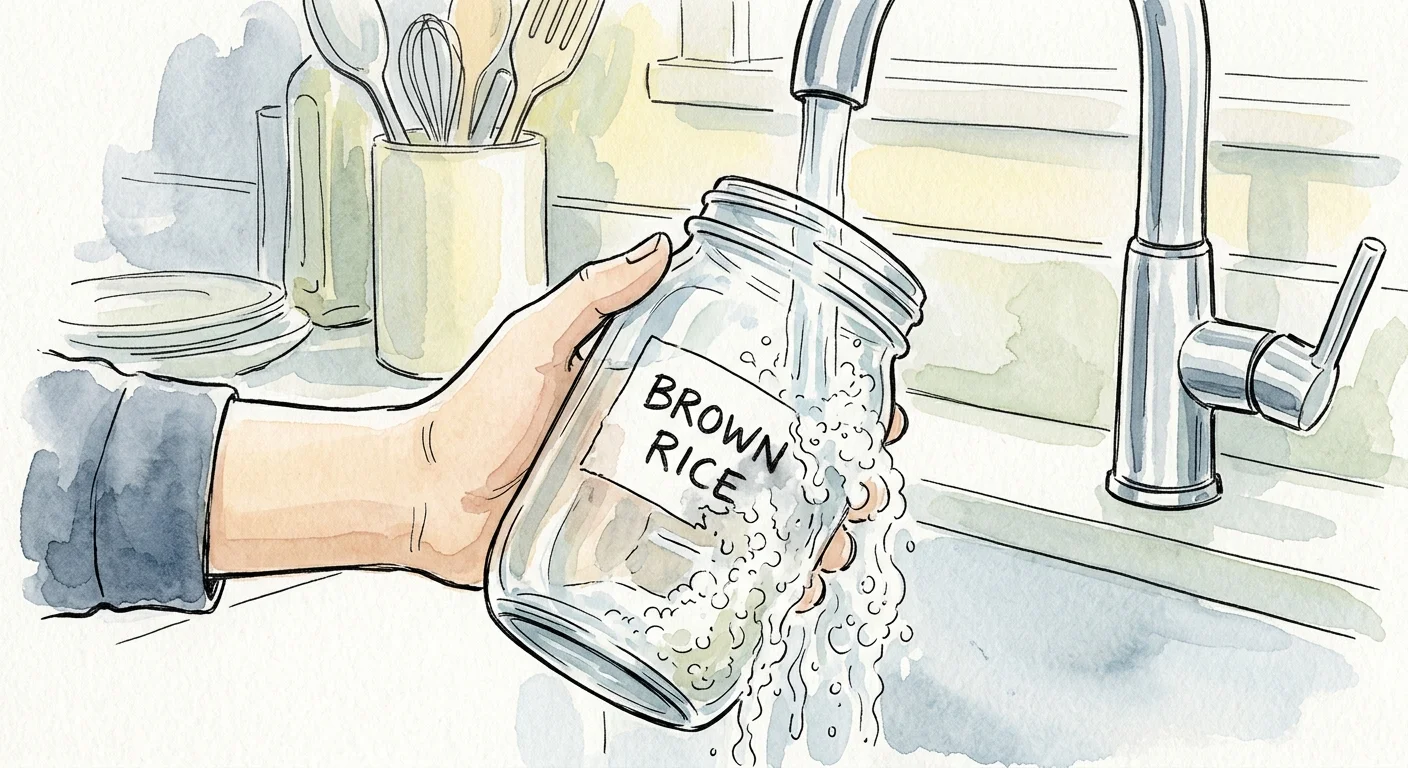
2. Dissolvable Write-On Labels for Zero-Waste Shopping
If you prefer buying from local co-ops or zero-waste grocery stores, you likely refill your own glass jars. Constantly scraping off old masking tape leaves a sticky, gray residue that collects dust and makes your pantry look dirty. Dissolvable write-on labels change this entire routine by providing a clean slate every time you finish a product.
You write the tare weight, the product name, and the date of purchase directly on the label. When the jar is completely empty, you simply run it under warm tap water, and the label vanishes in seconds without any scrubbing required. Grocery shopping becomes incredibly efficient because you can carry your clean, empty jars straight to the bulk food store without spending thirty minutes battling old adhesive. You maintain a pristine pantry while effortlessly tracking the freshness of your bulk purchases.
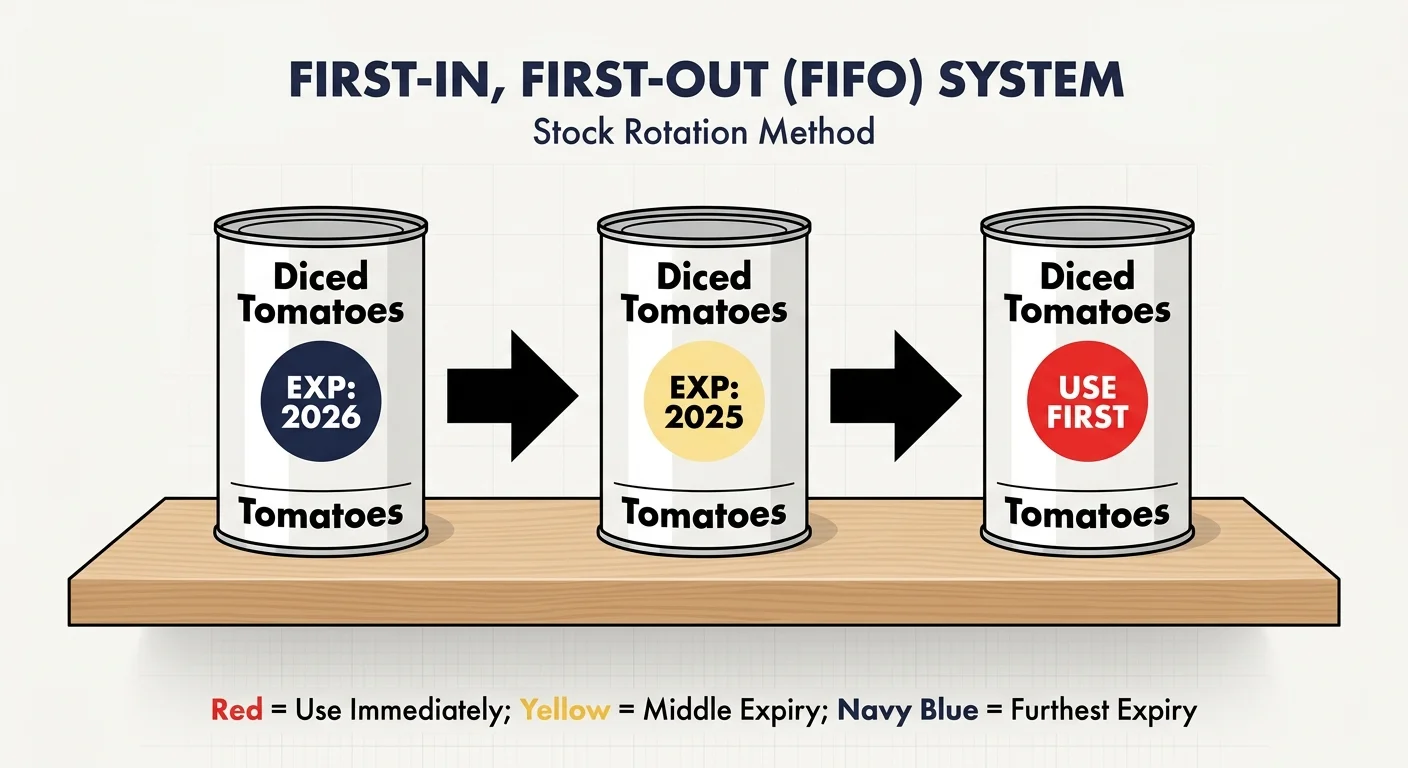
3. The First-In, First-Out (FIFO) Color-Coded System
Grocery stores and commercial kitchens rely on strict inventory rotation to prevent massive financial losses from expired food; you can easily bring this professional strategy into your home kitchen. The First-In, First-Out method forces you to consume older products before opening newly purchased ones. To implement this, buy a pack of small, colored dot stickers. Assign yellow to items purchased this year and blue to items expiring next year, or color-code by expiration month for shorter-shelf-life goods.
The United States Department of Agriculture emphasizes the First-In, First-Out system of inventory management to maintain optimal food condition and prevent spoilage. When you unpack your grocery bags, place a dot on the top of the can and push it to the back of the shelf, pulling the older items forward. This directly influences your shopping habits because you immediately stop buying canned tomatoes when you see three yellow-dotted cans waiting at the front of the line.
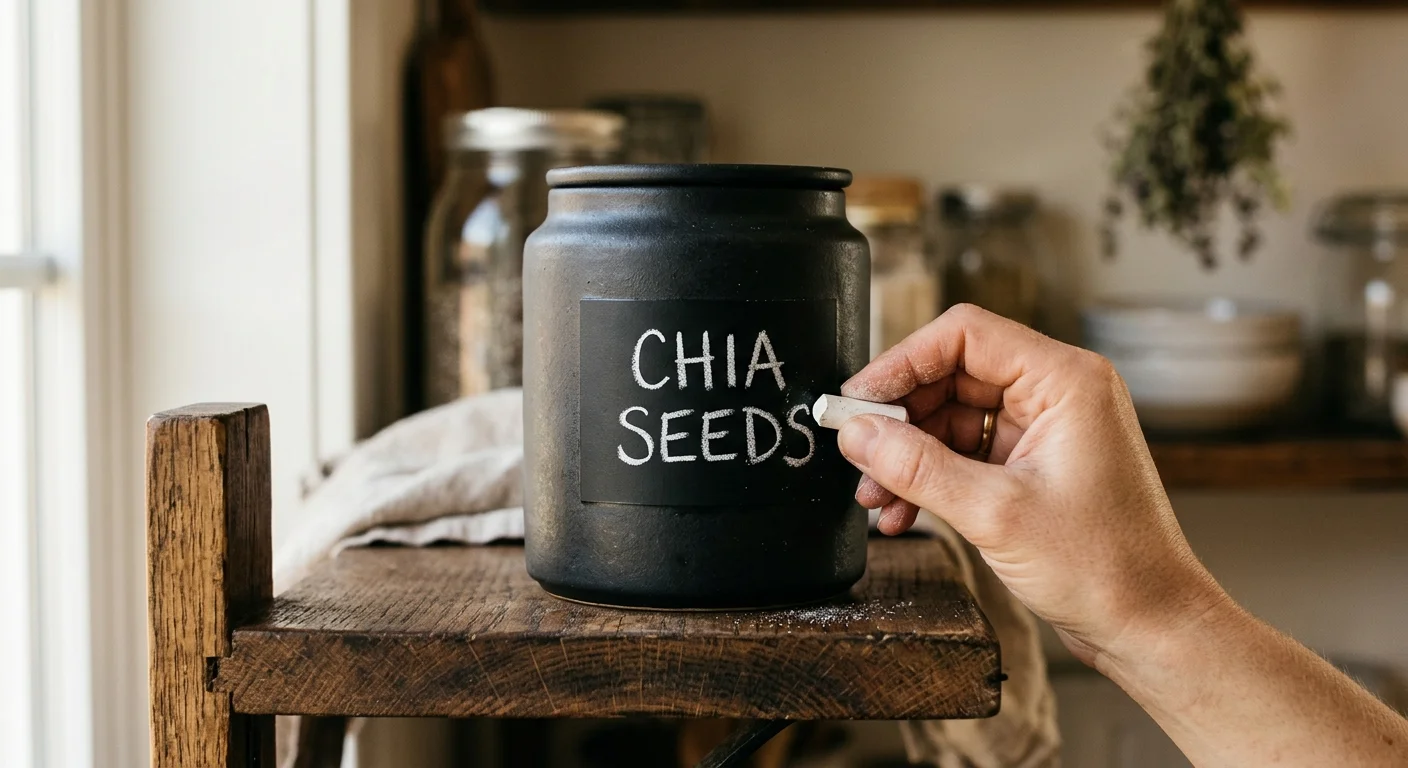
4. Reusable Chalkboard Labels for Changing Inventories
Pantry inventory fluctuates constantly. One week a container holds almonds; the next week it holds pretzels. Replacing adhesive labels every time you switch snacks gets expensive and tedious. Chalkboard stickers paired with liquid chalk markers offer incredible flexibility for shelves that see high turnover.
You simply wipe the surface with a damp cloth, dry it, and write the new contents. The liquid chalk dries completely matte and will not smudge when you grab the jar with dry hands. This directly streamlines your grocery shopping because you never have a mystery container of unlabeled grains sitting on the shelf. You know exactly what you have, which means you never accidentally buy a duplicate. When selecting liquid chalk markers for a home with young children or pets, look for the Art and Creative Materials Institute (ACMI) AP Seal. This seal certifies that the art materials are non-toxic and do not contain sufficient quantities of materials to cause short-term or long-term health problems.
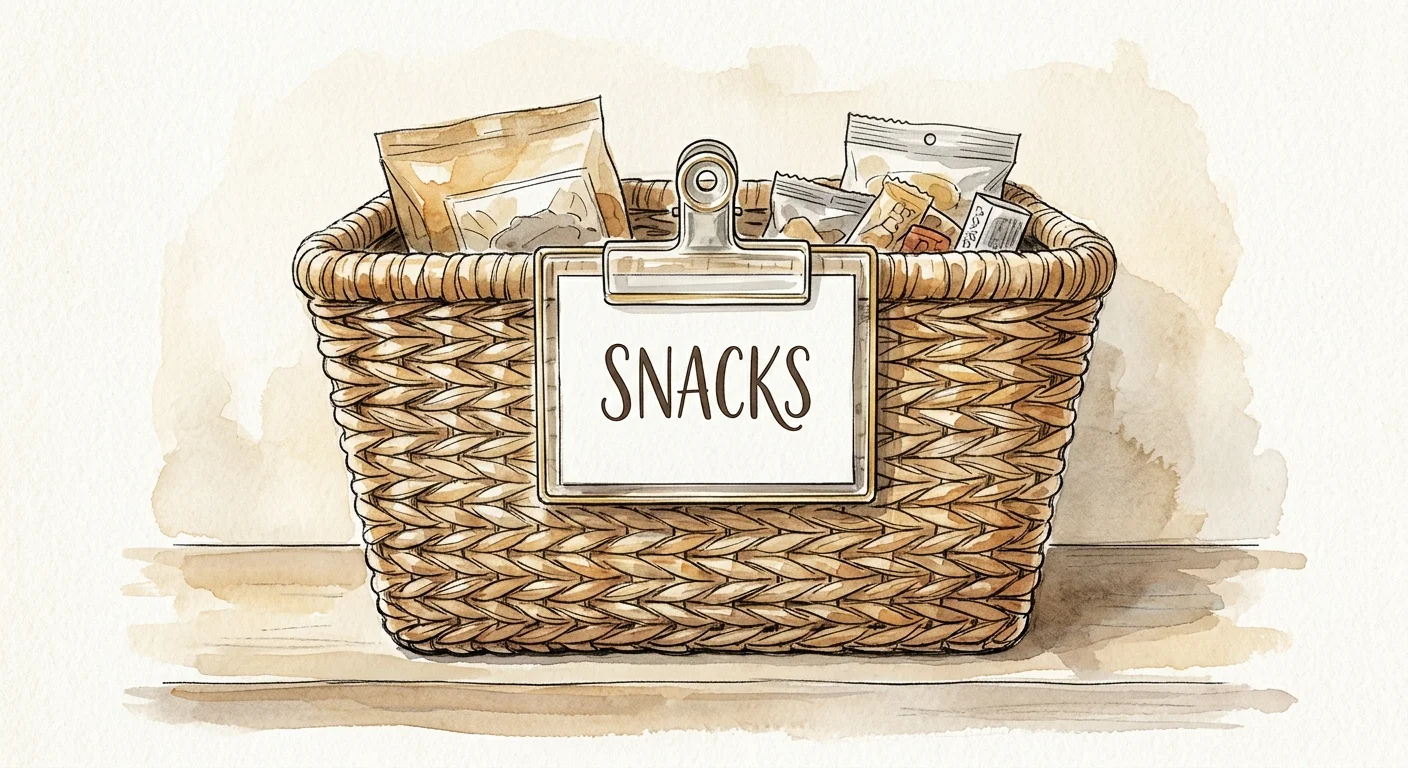
5. Clear Bin Clips with Insertable Cards for Textured Storage
Many of us use beautiful woven hyacinth baskets or textured fabric bins to hide the visual chaos of chip bags, snack pouches, and loose packets. Unfortunately, traditional adhesive labels will not stick to these uneven surfaces. Clear bin clips slide perfectly over the top edge of any basket, featuring a protective slot where you can slide in a piece of printed cardstock.
Instead of labeling every individual granola bar, you label the clip with a broad category like “Breakfast Bars” or “Salty Snacks.” Before you head to the store, you simply pull out the “Breakfast Bars” bin. If it feels light and looks empty, you confidently add bars to your list. This macro-level organization saves you from digging through the depths of your shelves, ensuring your grocery list is compiled in a fraction of the usual time.
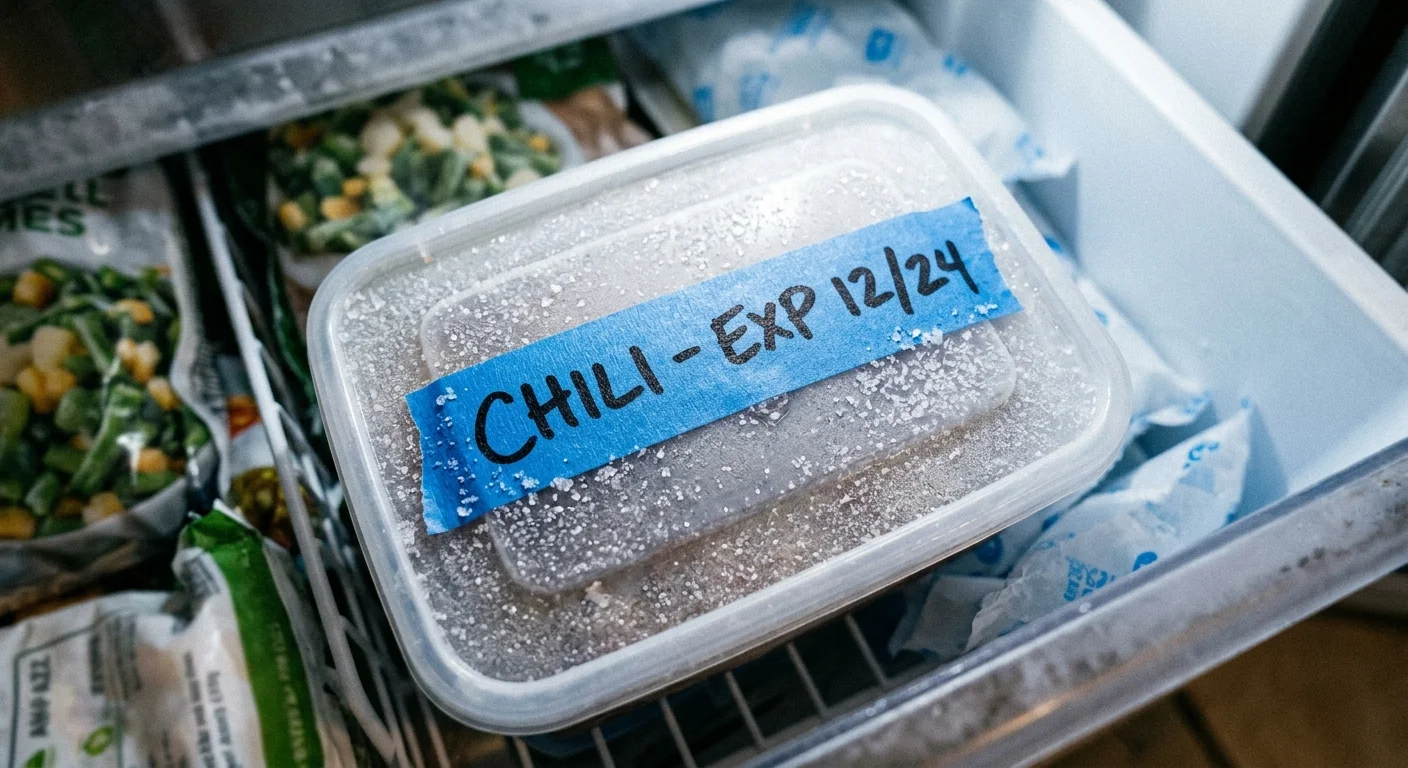
6. Expiration Date Masking Tape for Deep Storage
Sometimes the simplest, most utilitarian approach outperforms expensive organizational tools. A roll of brightly colored painter’s tape or masking tape and a thick black marker can revolutionize how you manage your deep freezer and bulk pantry items. Manufacturers often print expiration dates in microscopic, faded ink on the bottom of boxes—making it impossible to see at a glance.
Cut a piece of tape, stick it clearly on the front of the item, and write the expiration date in large numbers. The Food and Drug Administration reminds consumers that checking for expired or spoiled items and disposing of them promptly is essential for minimizing the risk of foodborne illnesses. This highly visible cue acts as a built-in meal planner. If the tape says a chicken broth carton expires this week, you prioritize soup on your menu rather than purchasing new ingredients at the store.
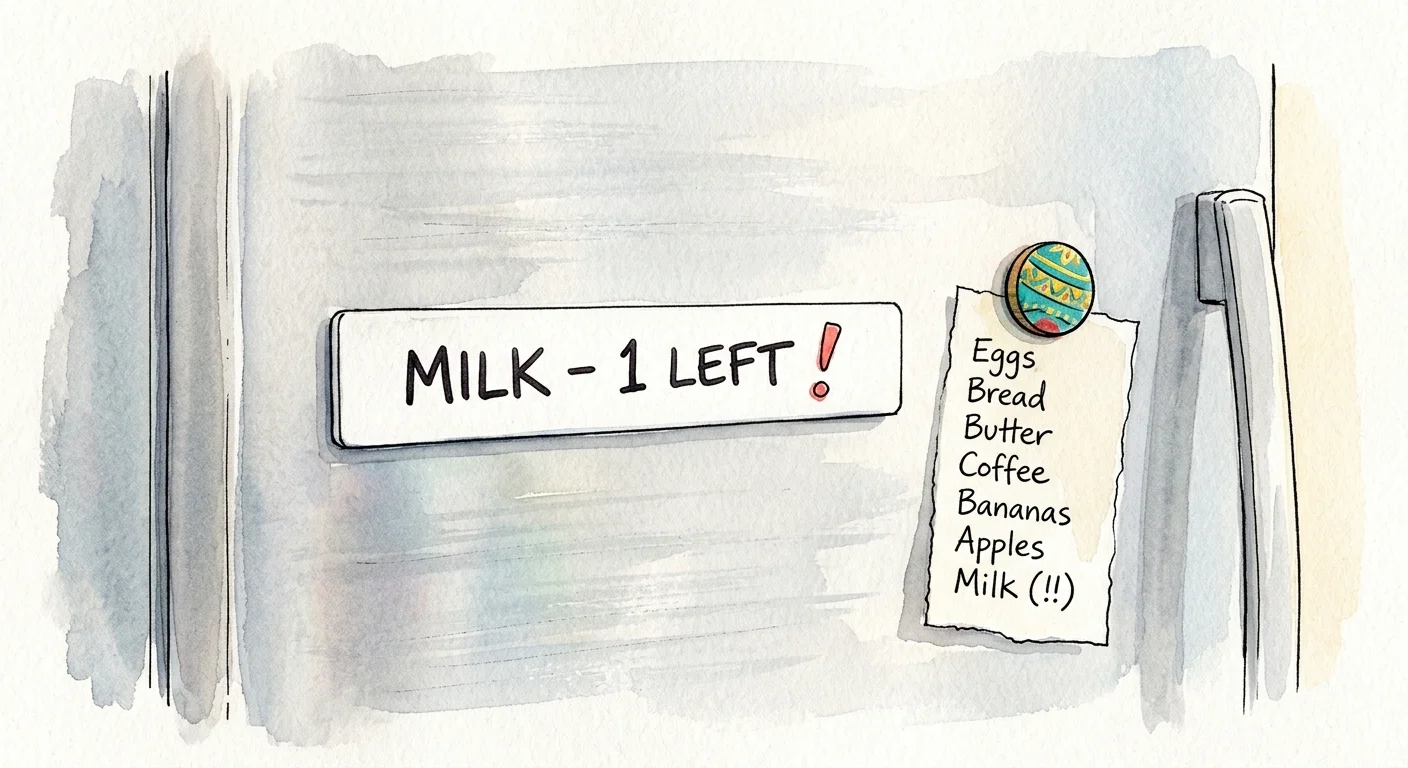
7. Magnetic Whiteboard Strips for Running Tallies
If you utilize wire shelving units or a pantry door painted with magnetic paint, magnetic whiteboard strips act as movable, highly effective inventory trackers. Cut the strips to match the width of your jars or bins so you can slide them around as you rearrange your pantry layout.
The real magic happens when you use these strips to keep a running tally of your family’s favorite staples. Write “Canned Black Beans” on the strip and draw four tally marks. Every time you cook a recipe and use a can, wipe away one mark. The moment that tally hits zero, you pull out your phone and add beans to your grocery app. This immediate documentation guarantees you never arrive at the supermarket wondering if you have enough base ingredients for your weekly chili.
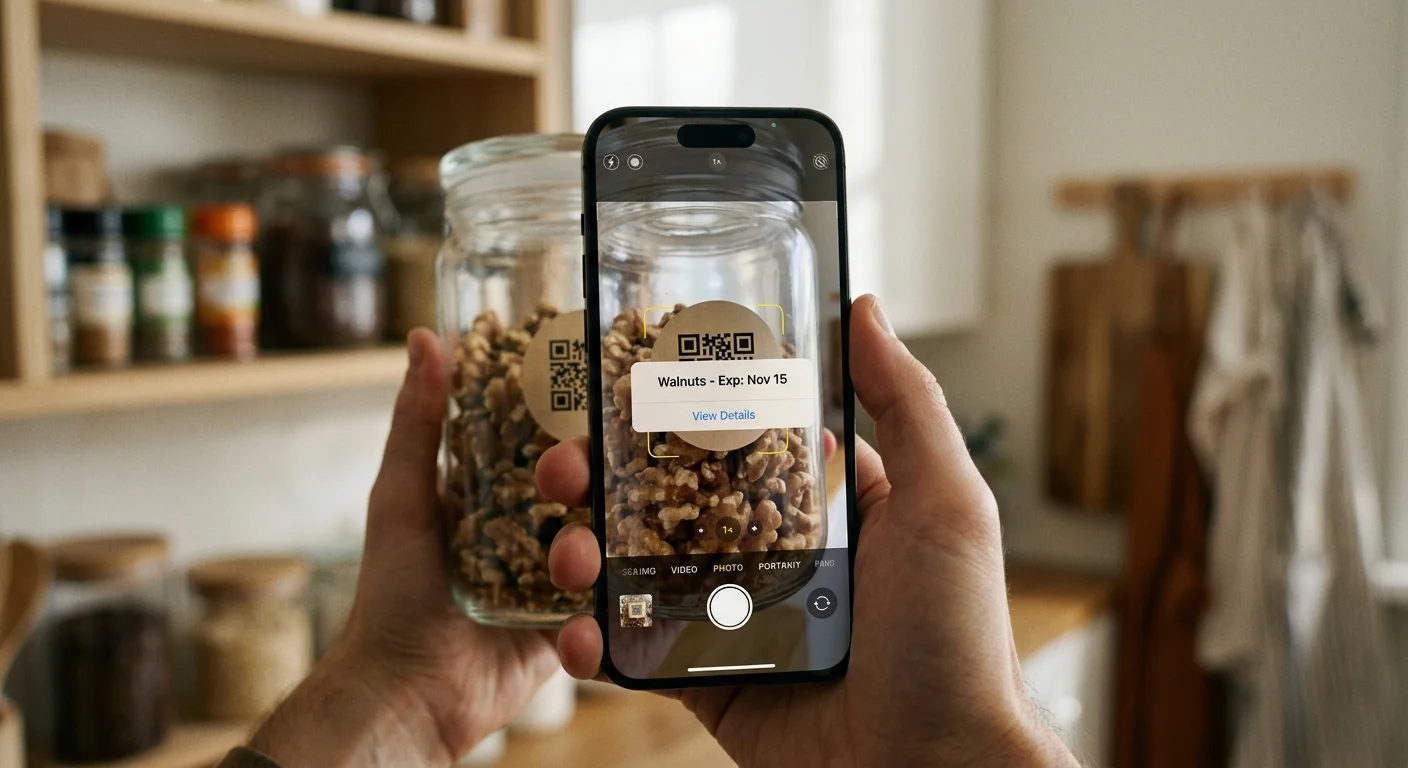
8. Smart QR Code Labels for Digital Tracking
For the highly analytical homeowner who loves data, smart labels bring sophisticated digital inventory management straight to the kitchen. You can print unique QR codes and adhere them to your deep storage zones, opaque bins, or basement overstock shelves.
When scanned with your smartphone, the code opens a shared digital spreadsheet or a specialized inventory app detailing exactly what resides inside, along with quantity levels and expiration dates. This system truly shines when you are standing in the middle of a crowded grocery store aisle. Instead of calling home to ask your partner to dig through the pantry, you open the app and instantly see your precise inventory. It requires a bit of upfront data entry, but the absolute accuracy it offers during shopping eliminates duplicate purchases entirely.
9. Dry Erase Tape Rolls for Shelf Edges
Dry erase tape looks and applies just like standard tape but features a glossy, wipeable surface. You can run a long, continuous strip of it directly along the front lip of your pantry shelves, effectively creating a massive whiteboard right beneath your food.
You can draw arrows pointing to specific items, write expiration dates, or leave notes for your family members like “Eat first!” or “Save for Friday’s dinner.” During your grocery planning session, you simply stand in front of the pantry and read the shelf edges. You instantly know what needs replenishing without having to touch a single container or open a single lid. You can even snap a quick photo of the shelf edge before walking out the door, bringing your entire inventory list with you.
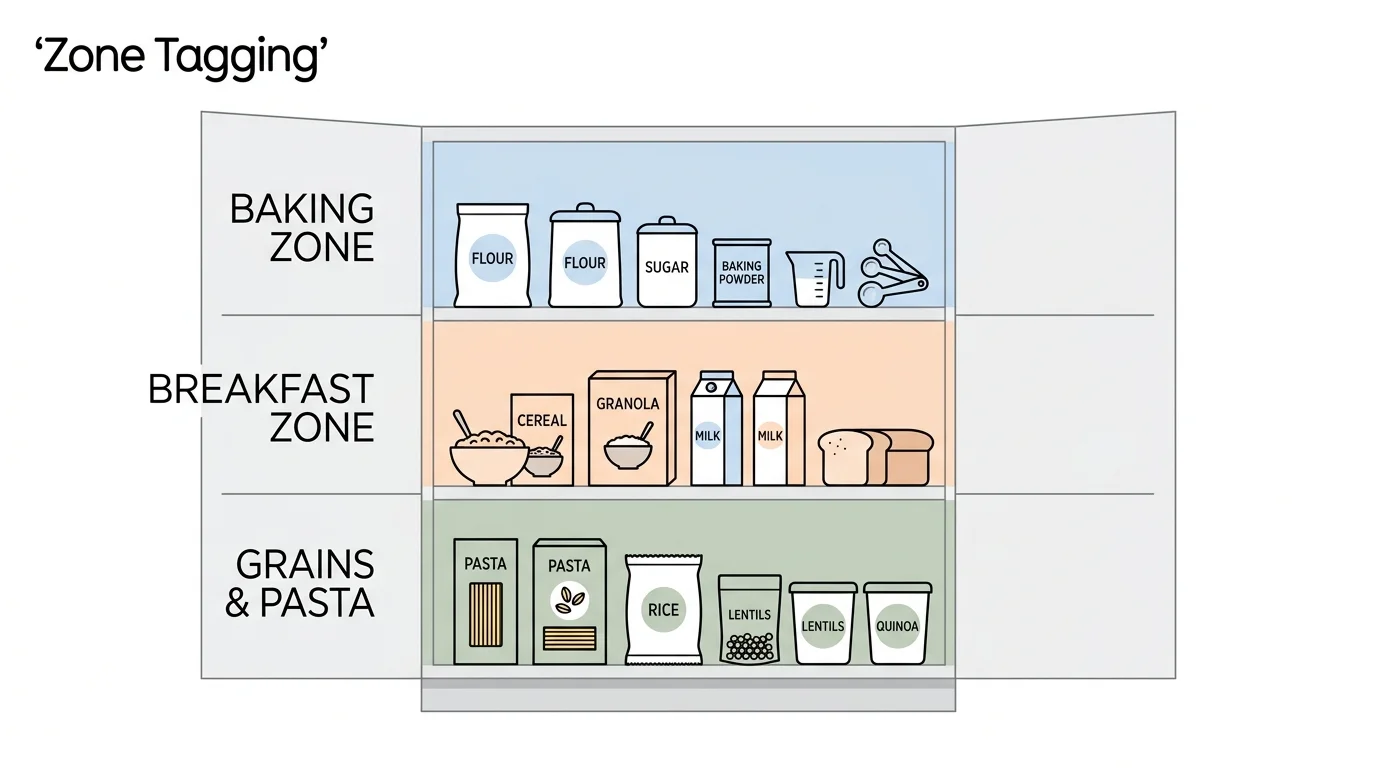
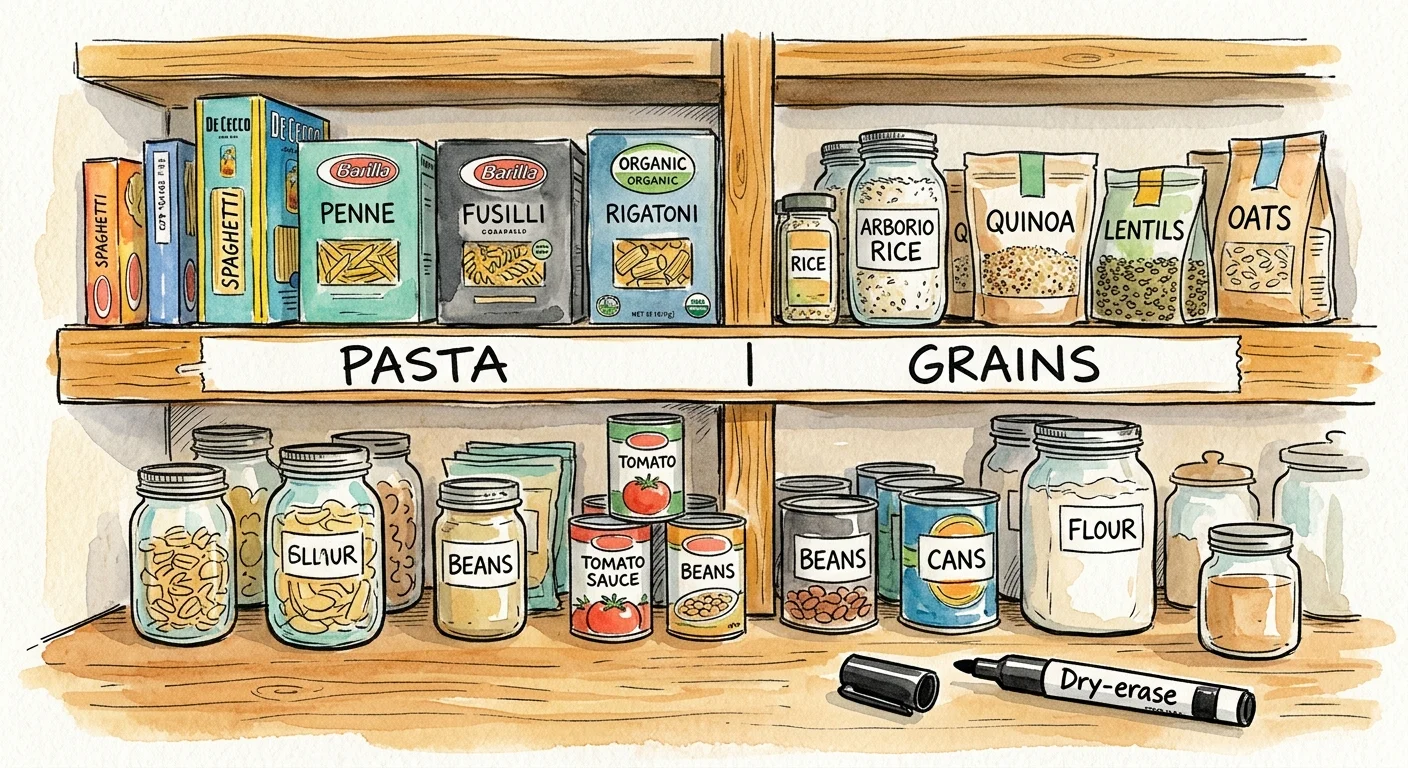
10. Zone Tagging for Broad Categories
Not everyone has the time or energy to decant every box of cereal and bag of rice into matching acrylic containers. If you prefer keeping food in its original packaging, zone tagging is the most realistic and sustainable system. Instead of labeling the individual food item, you label the physical real estate of the pantry.
Use metal label holders or wooden hanging tags to designate a specific shelf for baking supplies, another for canned vegetables, and a lower shelf dedicated solely to lunchbox snacks. When everything has a strict boundary, you immediately notice when a zone looks sparse. If the baking shelf has plenty of empty space, you know right away that you need to audit your flour, sugar, and baking powder before you drive to the store. It speeds up the unpacking process, too, since every grocery item has a predetermined home.

How to Safely Remove Stubborn Adhesive Before You Relabel
Before you can implement your brilliant new labeling system, you often have to deal with the frustrating residue left behind by old stickers and manufacturing labels. Getting a completely clean surface ensures your new decals or tape will stick properly and look pristine. Follow these steps to remove stubborn glue without scratching your containers.
- Soak the containers in warm water: Fill your sink with warm water and a generous squirt of dish soap. Submerge your glass jars or sturdy plastic bins for ten to twenty minutes to weaken the paper layer of the old label.
- Peel the top layer gently: Use your fingernail or a specialized plastic scraper to lift the label from one corner. Try to pull as much of the paper off as possible so the solvent can reach the underlying glue.
- Apply a dedicated solvent: Soak a paper towel or cotton ball in your chosen remover and press it directly onto the sticky residue. White vinegar works well for environmentally friendly removal, while rubbing alcohol dissolves tough glues rapidly without leaving a greasy finish behind.
- Allow the solvent to sit: Give the liquid three to five minutes to fully penetrate and break down the adhesive bonds. Do not rush this step; letting the solvent do the heavy lifting prevents you from having to scrub aggressively.
- Wash and dry thoroughly: Once the glue wipes away cleanly, wash the container again with dish soap to remove any lingering chemical traces or odors before placing the jar back into your pantry.

Comparing Pantry Label Materials for Your Kitchen
If you are unsure which system fits your lifestyle, use this comparison table to evaluate the durability and maintenance effort required for each popular labeling material.
| Label Type | Best Use Case | Durability | Effort to Update Inventory |
|---|---|---|---|
| Dissolvable Labels | Bulk bins and rotating glass jars | Low (melts easily in water) | Very Easy (washes away instantly) |
| Pre-printed Decals | Clear decanted staples (flour, rice) | High (water-resistant, permanent) | Hard (requires peeling and replacing) |
| Chalkboard Labels | Constantly rotating snack jars | Medium (can smudge if wet) | Easy (wipes clean with a damp cloth) |
| Clear Bin Clips | Woven baskets and textured fabric bins | High (hard plastic protects the card) | Very Easy (simply swap the paper card) |
| Dry Erase Tape | Shelf edges and solid plastic bins | Medium (can peel at the corners over time) | Very Easy (wipes clean instantly) |
Your Practical Next Step
Do not attempt to reorganize your entire kitchen in a single afternoon. Choose just one shelf or one specific category—like your baking supplies or your snack baskets—and apply your favorite labeling system from this list today. Once you experience how much faster and easier your next grocery shopping trip becomes, you will naturally build the momentum to expand the system to the rest of your pantry.